Dell S510n Dell Interactive Projector S510/ Users Guide - Page 46
Menu Settings
 |
View all Dell S510n manuals
Add to My Manuals
Save this manual to your list of manuals |
Page 46 highlights
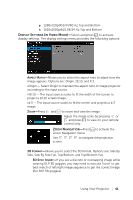
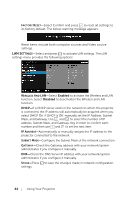
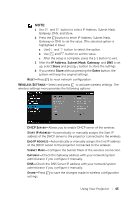
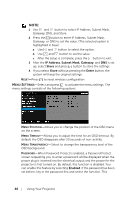
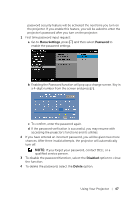
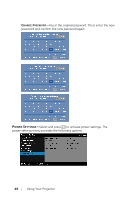
NOTE: 1 Use and button to select IP Address, Subnet Mask, Gateway, DNS, and Store. 2 Press the button to enter IP Address, Subnet Mask, Gateway, or DNS to set the value. (The selected option is highlighted in blue) a Use and button to select the option. b Use and button to set the value. c After the setup is complete, press the button to exit. 3 After the IP Address, Subnet Mask, Gateway, and DNS is set up, select Store and press button to store the settings. 4 If you select Store without pressing the Enter button, the system will keep the original settings. RESET-Press to reset wireless configuration. MENU SETTINGS-Select and press to activate the menu settings. The menu settings consists of the following options: MENU POSITION-Allows you to change the position of the OSD menu on the screen. MENU TIMEOUT-Allows you to adjust the time for an OSD timeout. By default, the OSD disappears after 20 seconds of non-activity. MENU TRANSPARENCY-Select to change the transparency level of the OSD background. PASSWORD-When Password Protect is enabled, a Password Protect screen requesting you to enter a password will be displayed when the power plug is inserted into the electrical output and the power for the projector is first turned on. By default, this function is disabled. You can enable this feature by selecting Enabled. If the password has been set before, key in the password first and select the function. This 46 Using Your Projector
-
 1
1 -
2
-
3
-
4
-
5
-
6
-
7
-
8
-
9
-
10
-
11
-
12
-
13
-
14
-
15
-
16
-
17
-
18
-
19
-
20
-
21
-
22
-
23
-
24
-
25
-
26
-
27
-
28
-
29
-
30
-
31
-
32
-
33
-
34
-
35
-
36
-
37
-
38
-
39
-
40
-
 41
41 -
 42
42 -
 43
43 -
 44
44 -
 45
45 -
 46
46 -
 47
47 -
 48
48 -
 49
49 -
 50
50 -
 51
51 -
52
-
53
-
54
-
55
-
56
-
57
-
58
-
59
-
60
-
61
-
62
-
63
-
64
-
65
-
66
-
67
-
68
-
69
-
70
-
71
-
72
-
73
-
74
-
75
-
76
-
77
-
78
-
79
-
80
-
81
-
82
-
83
-
84
-
85
-
86
-
87
-
88
-
89
-
90
-
91
-
92
-
93
-
94
-
95
-
96
-
97
-
98
-
99
-
100
-
101
-
102
-
103
-
104
-
105
-
106
-
107
-
108
-
109
-
110
-
111
-
112
-
113
-
114
-
115
-
116
-
117
-
118
-
119
-
120
-
121
-
122
-
123
-
124
-
125
-
126
-
127
-
128
-
129
-
130
-
131
-
132
-
133
-
134
-
135
-
136
-
137
-
138
-
139
-
140
-
141
-
142
-
143
-
144
-
145
-
146
-
147
-
148
-
149
-
150
-
151
-
152
-
153
-
154
-
155
 |
 |
