Denon AVR-5805CI Owners Manual - English - Page 130
Power Amp Assign at the Option Setup
 |
UPC - 081757507424
View all Denon AVR-5805CI manuals
Add to My Manuals
Save this manual to your list of manuals |
Page 130 highlights
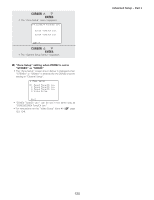
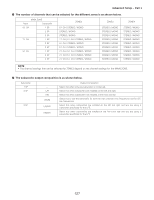
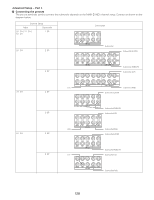
Advanced Setup - Part 1 1 Press the CURSOR D or H button to select "Power Amp Assign" at the "Option Setup" menu, then press the ENTER button. • The "Power Amp Assign" screen appears. 2 Press the CURSOR F or G button to select the Amp Assign mode according to the speaker system you want to achieve. Normal: This is the recommended amplifier assignment mode. Normally select this when not conducting the power amplifier assignment. By default, this is set to "Normal". Advanced: With this mode, the power amplifiers can be assigned freely to the desired channels according to the speaker system you are using. Adv+Front B: With this mode, the power amplifiers can be assigned freely to the desired channels and front B. The following modes can be selected when there are power amplifiers that are free with respect to the recommended amplifier assignment mode ("Normal"). +Zone2: This mode is the setting of the status in which the power amplifier is assigned to the ZONE2 output channel. +Zone3: This mode is the setting of the status in which the power amplifier is assigned to the ZONE3 output channel. +Zone4: This mode is the setting of the status in which the power amplifier is assigned to the ZONE4 output channel. +Zone2/3: This mode is the setting of the status in which the power amplifier is assigned simultaneously to the ZONE2 and 3 output channels. +Zone3/4: This mode is the setting of the status in which the power amplifier is assigned simultaneously to the ZONE3 and 4 output channels. +Zone2/4: This mode is the setting of the status in which the power amplifier is assigned simultaneously to the ZONE2 and 4 output channels. +Zone2/3/4: This mode is the setting of the status in which the power amplifier is assigned simultaneously to the ZONE2, 3 and 4 output channels. Bi-Amp+Front: This mode is the setting for playing the front channel with bi-amp connections. Bi-Amp: This mode is the setting for playing the front, center and surround channels with bi-amp connections. When "Advanced" or "Adv+Front B" is selected, the power amplifiers can be assigned freely to the desired channels. 3 When "Advanced" or "Adv+Front B" is selected: Press the CURSOR D or H button to select the power amplifier to be assigned, then press the CURSOR F or G button to select which channel to assigned the amplifier to. 4 Press the ENTER button to enter the setting. • The "Option Setup" menu reappears. • The amplifier assignment modes that can be selected differ according to the channel settings made at "Channel Setup" ( page 126 ~ 128). • The status in which power amplifiers are assigned to output channels in the different amplifier assignment modes differs according to the channel settings for the different zones ( page 131, 132). • If the "Advanced" or "Adv+Front B" amplifier assignment mode is selected, the channels to which power amplifiers can be assigned differ according to the channel settings for the different zones ( page 133). 130
-
 1
1 -
2
-
3
-
4
-
5
-
6
-
7
-
8
-
9
-
10
-
11
-
12
-
13
-
14
-
15
-
16
-
17
-
18
-
19
-
20
-
21
-
22
-
23
-
24
-
25
-
26
-
27
-
28
-
29
-
30
-
31
-
32
-
33
-
34
-
35
-
36
-
37
-
38
-
39
-
40
-
41
-
42
-
43
-
44
-
45
-
46
-
47
-
48
-
49
-
50
-
51
-
52
-
53
-
54
-
55
-
56
-
57
-
58
-
59
-
60
-
61
-
62
-
63
-
64
-
65
-
66
-
67
-
68
-
69
-
70
-
71
-
72
-
73
-
74
-
75
-
76
-
77
-
78
-
79
-
80
-
81
-
82
-
83
-
84
-
85
-
86
-
87
-
88
-
89
-
90
-
91
-
92
-
93
-
94
-
95
-
96
-
97
-
98
-
99
-
100
-
101
-
102
-
103
-
104
-
105
-
106
-
107
-
108
-
109
-
110
-
111
-
112
-
113
-
114
-
115
-
116
-
117
-
118
-
119
-
120
-
121
-
122
-
123
-
124
-
 125
125 -
 126
126 -
 127
127 -
 128
128 -
 129
129 -
 130
130 -
 131
131 -
 132
132 -
 133
133 -
 134
134 -
 135
135 -
136
-
137
-
138
-
139
-
140
-
141
-
142
-
143
-
144
-
145
-
146
-
147
-
148
-
149
-
150
-
151
-
152
-
153
-
154
-
155
-
156
-
157
-
158
-
159
-
160
-
161
-
162
-
163
-
164
-
165
-
166
-
167
-
168
-
169
-
170
-
171
-
172
-
173
-
174
-
175
-
176
-
177
-
178
-
179
-
180
-
181
-
182
-
183
-
184
-
185
-
186
-
187
-
188
-
189
-
190
-
191
-
192
-
193
-
194
-
195
-
196
-
197
-
198
-
199
-
200
-
201
-
202
-
203
-
204
-
205
-
206
-
207
-
208
-
209
-
210
-
211
-
212
-
213
-
214
 |
 |
