Dirt Devil ND40100 Revision 1 (3/2011) - Page 24
Troubleshooting, Mantenimiento General
 |
View all Dirt Devil ND40100 manuals
Add to My Manuals
Save this manual to your list of manuals |
Page 24 highlights
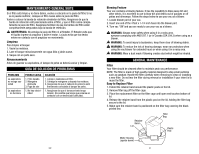
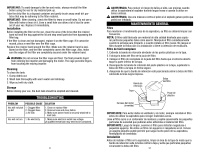
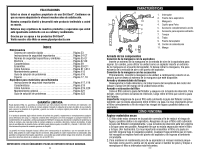
IMPORTANT: To avoid damage to the fan and motor, always reinstall the filter before using the vac for dry material pick-up. Take the dirty filter to a disposal container and gently brush away small dirt particles that may be adhering to the filter material. IMPORTANT: After cleaning, check the filter for tears or small holes. Do not use a filter with holes or tears in it. Even a small hole can allow a lot of dust to come out of your vac. Replace it immediately. Installation Before installing the filter on the vac, clean the area of the lid so that the retainer band will seal the bag against the lid and stop small particles from bypassing the filter bag. If the filter is clean and not damaged, replace it on the filter cage. If it cannot be reused, place a new filter over the filter cage. Replace the retainer band around the filter. Make sure the retainer band is positioned on the filter, and the filter completely covers the filter cage. Also, make sure the edges of the filter are completely secured under the retainer band. WARNING: Do not remove the filter cage and float. The float prevents liquid from entering the impeller and damaging the motor. The cage prevents fingers from touching the moving impeller. Cleaning To clean the tank: 1. Dump debris out. 2. Wash tank thoroughly with warm water and mildsoap. 3. Wipe out with dry cloth. Storage Before storing your vac, the dust tank should be emptied and cleaned. TROUBLESHOOTING PROBLEM POSSIBLE CAUSE Vac will not pick 1. Clogged filter up dirt 2. Clogged hose 3. Air leak Vac will not run 1. No electricity SOLUTION 1. Clean or replace filter 2. Remove hose and clear debris. 3. Make sure power head is securely attached to dust tank. 1. Make sure electrical outlet has voltage. (A qualified electrician may need to be contacted). 24 ADVERTENCIA: Para reducir el riesgo de daños al oído, use orejeras cuando utilice la aspiradora/el soplador durante largas horas o cuando la utilice en áreas ruidosas. ADVERTENCIA: Use una máscara contra el polvo si el soplado genera polvo que podría ser inhalado. MANTENIMIENTO GENERAL Filtro Para mantener el rendimiento pico de la aspiradora, su filtro se debería limpiar con frecuencia. NOTA: El filtro está fabricado con material de alta calidad diseñado para capturar partículas pequeñas tales como aserrín. Manipule el filtro cuidadosamente cuando lo extraiga para limpiarlo, o cuando instale un filtro nuevo. No rasgue el filtro durante la extracción o la instalación si tiene la intención de reutilizarlo. Filtro de fácil reemplazo 1. Extienda la banda de retención alrededor de los postes plásticos en la tapa. 2. Extraiga la bolsa del filtro de la jaula del filtro. 3. Coloque el filtro de reemplazo en la jaula del filtro hasta que el extremo abierto toque la parte inferior de la tapa. 4. Desenganche la banda de retención del poste plástico en la tapa, sujetando la bolsa del filtro a la tapa en forma segura. 5. Asegúrese de que la banda de retención esté posicionada sobre la bolsa del filtro cubriendo la línea negra impresa. Banda de retención Bolsa del filtro Tapa Poste de plástico Carcasa del motor (invertida) IMPORTANTE: Para evitar daños al ventilador y al motor, siempre reinstale el filtro antes de utilizar la aspiradora para recoger materiales secos. Lleve el filtro sucio a un contenedor de residuos y cepille suavemente las pequeñas partículas de suciedad que pudieran estar adheridas al material del filtro. IMPORTANTE: Luego de limpiar, examine el filtro para detectar rasgaduras o pequeños agujeros. No utilice un filtro con agujeros ni rasgaduras en él. Incluso un agujerp pequeño puede permitir que salga mucho polvo de su aspiradora. Reemplácelo de inmediato. Instalación Antes de instalar el filtro en la aspiradora, limpie el área de la tapa de modo que la banda de retención selle la bolsa contra la tapa y evite que partículas pequeñas circunvalen la bolsa del filtro. E21
-
 1
1 -
2
-
3
-
4
-
5
-
6
-
7
-
8
-
9
-
10
-
11
-
12
-
13
-
14
-
15
-
16
-
17
-
18
-
 19
19 -
 20
20 -
 21
21 -
 22
22 -
 23
23 -
 24
24 -
 25
25 -
 26
26 -
 27
27 -
 28
28 -
 29
29 -
30
-
31
-
32
-
33
-
34
 |
 |
