Epson 1815p User's Guide - Page 151
Transferring Files by FTP
 |
UPC - 010343858190
View all Epson 1815p manuals
Add to My Manuals
Save this manual to your list of manuals |
Page 151 highlights
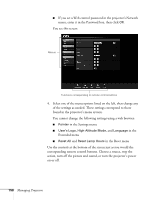
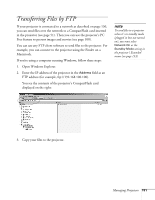
Transferring Files by FTP If your projector is connected to a network as described on page 136, you can send files over the network to a CompactFlash card inserted in the projector (see page 51). Then you can use the projector's PC Free feature to present images and movies (see page 100). You can use any FTP client software to send files to the projector. For example, you can connect to the projector using the Finder on a Macintosh. If you're using a computer running Windows, follow these steps: 1. Open Windows Explorer. 2. Enter the IP address of the projector in the Address field as an FTP address (for example, ftp://192.168.100.100). You see the contents of the projector's CompactFlash card displayed on the right: note To send files to a projector when it's in standby mode (plugged in but not turned on), you must select Network On as the Standby Mode setting in the projector's Extended menu (see page 133). 3. Copy your files to the projector. Managing Projectors 151
-
 1
1 -
2
-
3
-
4
-
5
-
6
-
7
-
8
-
9
-
10
-
11
-
12
-
13
-
14
-
15
-
16
-
17
-
18
-
19
-
20
-
21
-
22
-
23
-
24
-
25
-
26
-
27
-
28
-
29
-
30
-
31
-
32
-
33
-
34
-
35
-
36
-
37
-
38
-
39
-
40
-
41
-
42
-
43
-
44
-
45
-
46
-
47
-
48
-
49
-
50
-
51
-
52
-
53
-
54
-
55
-
56
-
57
-
58
-
59
-
60
-
61
-
62
-
63
-
64
-
65
-
66
-
67
-
68
-
69
-
70
-
71
-
72
-
73
-
74
-
75
-
76
-
77
-
78
-
79
-
80
-
81
-
82
-
83
-
84
-
85
-
86
-
87
-
88
-
89
-
90
-
91
-
92
-
93
-
94
-
95
-
96
-
97
-
98
-
99
-
100
-
101
-
102
-
103
-
104
-
105
-
106
-
107
-
108
-
109
-
110
-
111
-
112
-
113
-
114
-
115
-
116
-
117
-
118
-
119
-
120
-
121
-
122
-
123
-
124
-
125
-
126
-
127
-
128
-
129
-
130
-
131
-
132
-
133
-
134
-
135
-
136
-
137
-
138
-
139
-
140
-
141
-
142
-
143
-
144
-
145
-
 146
146 -
 147
147 -
 148
148 -
 149
149 -
 150
150 -
 151
151 -
 152
152 -
 153
153 -
 154
154 -
 155
155 -
 156
156 -
157
-
158
-
159
-
160
-
161
-
162
-
163
-
164
-
165
-
166
-
167
-
168
-
169
-
170
-
171
-
172
-
173
-
174
-
175
-
176
-
177
-
178
-
179
-
180
-
181
-
182
-
183
-
184
-
185
-
186
-
187
-
188
-
189
-
190
-
191
-
192
-
193
-
194
-
195
-
196
-
197
-
198
-
199
-
200
-
201
-
202
-
203
-
204
 |
 |