Epson 1815p User's Guide - Page 38
Connecting to a Computer
 |
UPC - 010343858190
View all Epson 1815p manuals
Add to My Manuals
Save this manual to your list of manuals |
Page 38 highlights
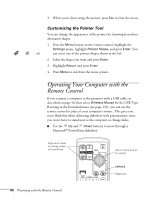
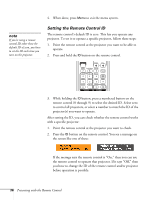
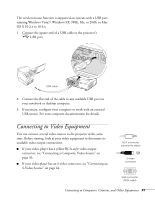
Connecting to a Computer You can connect the projector to any computer that has a standard video output (monitor) port, including desktop models, PC notebook computers, MacBook, PowerBook, and iBook computers, and hand-held devices. You can also connect a Windows computer to the Type B USB port on the projector (see page 39). This allows you to connect an additional computer to the projector. If you want to use the projector's remote control as a wireless mouse to operate your computer during presentations, see page 40. Connecting to the Computer Port You can connect to the projector using the VGA computer cable that came with it (the monitor port on your computer must be a mini D-sub 15-pin port). 1. If you're using the VGA computer cable, connect one end to the projector's Computer1 or Computer 2 port, and the other end to your computer's monitor port. caution Don't try to force a connector to fit a port with a different shape or number of pins. You may damage the port or connector. 2. You may need to change the Computer1 Input or Computer2 Input setting in the projector's Signal menu to RGB (see page 125). 38 Connecting to Computers, Cameras, and Other Equipment
-
 1
1 -
2
-
3
-
4
-
5
-
6
-
7
-
8
-
9
-
10
-
11
-
12
-
13
-
14
-
15
-
16
-
17
-
18
-
19
-
20
-
21
-
22
-
23
-
24
-
25
-
26
-
27
-
28
-
29
-
30
-
31
-
32
-
 33
33 -
 34
34 -
 35
35 -
 36
36 -
 37
37 -
 38
38 -
 39
39 -
 40
40 -
 41
41 -
 42
42 -
 43
43 -
44
-
45
-
46
-
47
-
48
-
49
-
50
-
51
-
52
-
53
-
54
-
55
-
56
-
57
-
58
-
59
-
60
-
61
-
62
-
63
-
64
-
65
-
66
-
67
-
68
-
69
-
70
-
71
-
72
-
73
-
74
-
75
-
76
-
77
-
78
-
79
-
80
-
81
-
82
-
83
-
84
-
85
-
86
-
87
-
88
-
89
-
90
-
91
-
92
-
93
-
94
-
95
-
96
-
97
-
98
-
99
-
100
-
101
-
102
-
103
-
104
-
105
-
106
-
107
-
108
-
109
-
110
-
111
-
112
-
113
-
114
-
115
-
116
-
117
-
118
-
119
-
120
-
121
-
122
-
123
-
124
-
125
-
126
-
127
-
128
-
129
-
130
-
131
-
132
-
133
-
134
-
135
-
136
-
137
-
138
-
139
-
140
-
141
-
142
-
143
-
144
-
145
-
146
-
147
-
148
-
149
-
150
-
151
-
152
-
153
-
154
-
155
-
156
-
157
-
158
-
159
-
160
-
161
-
162
-
163
-
164
-
165
-
166
-
167
-
168
-
169
-
170
-
171
-
172
-
173
-
174
-
175
-
176
-
177
-
178
-
179
-
180
-
181
-
182
-
183
-
184
-
185
-
186
-
187
-
188
-
189
-
190
-
191
-
192
-
193
-
194
-
195
-
196
-
197
-
198
-
199
-
200
-
201
-
202
-
203
-
204
 |
 |