Epson ActionNote 880CX User Manual - Page 78
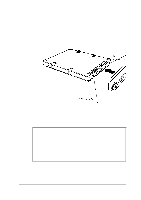
can accommodate drives up to 19 mm high. If the drive
 |
View all Epson ActionNote 880CX manuals
Add to My Manuals
Save this manual to your list of manuals |
Page 78 highlights
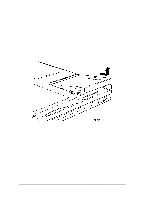
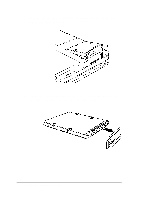
6. To install a new drive, you first need to attach the connector card. Align the holes in the card with the group of 44 pins on the right side of the drive connector. The metal tabs on the card should be facing up. Make sure the connector does not cover the group of four pins on the left side of the drive connector. 7. When you are sure the holes and pins are properly aligned, carefully push the card straight onto the pins, pressing firmly on the card until it is fully seated. Caution The hard disk drive compartment on your ActionNote can accommodate drives up to 19 mm high. If the drive that comes with your computer is less than 19 mm high, it is installed above a spacer. If you are going to install a 19 mm drive, remove the spacer from the compartment before you perform step 8. Installing Optional Devices 4-9
-
 1
1 -
2
-
3
-
4
-
5
-
6
-
7
-
8
-
9
-
10
-
11
-
12
-
13
-
14
-
15
-
16
-
17
-
18
-
19
-
20
-
21
-
22
-
23
-
24
-
25
-
26
-
27
-
28
-
29
-
30
-
31
-
32
-
33
-
34
-
35
-
36
-
37
-
38
-
39
-
40
-
41
-
42
-
43
-
44
-
45
-
46
-
47
-
48
-
49
-
50
-
51
-
52
-
53
-
54
-
55
-
56
-
57
-
58
-
59
-
60
-
61
-
62
-
63
-
64
-
65
-
66
-
67
-
68
-
69
-
70
-
71
-
72
-
 73
73 -
 74
74 -
 75
75 -
 76
76 -
 77
77 -
 78
78 -
 79
79 -
 80
80 -
 81
81 -
 82
82 -
 83
83 -
84
-
85
-
86
-
87
-
88
-
89
-
90
-
91
-
92
-
93
-
94
-
95
-
96
-
97
-
98
-
99
-
100
-
101
-
102
-
103
-
104
-
105
-
106
-
107
-
108
-
109
-
110
-
111
-
112
-
113
-
114
-
115
-
116
-
117
-
118
-
119
-
120
-
121
-
122
-
123
-
124
-
125
-
126
-
127
-
128
-
129
-
130
-
131
-
132
-
133
-
134
-
135
-
136
-
137
-
138
-
139
 |
 |
