Epson ActionPrinter 3250 User Manual - Page 35
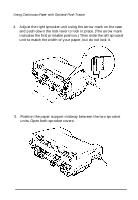
Position the paper support midway between the two sprocket, units. Open both sprocket covers.
 |
View all Epson ActionPrinter 3250 manuals
Add to My Manuals
Save this manual to your list of manuals |
Page 35 highlights
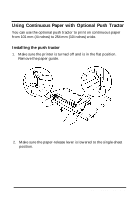
Using Continuous Paper with Optional Push Tractor 4. Adjust the right sprocket unit using the arrow mark on the case and push down the lock lever to lock in place. (The arrow mark indicates the first printable position.) Then slide the left sprocket unit to match the width of your paper, but do not lock it. 5. Position the paper support midway between the two sprocket units. Open both sprocket covers. 2-8 Paper Handling
-
 1
1 -
2
-
3
-
4
-
5
-
6
-
7
-
8
-
9
-
10
-
11
-
12
-
13
-
14
-
15
-
16
-
17
-
18
-
19
-
20
-
21
-
22
-
23
-
24
-
25
-
26
-
27
-
28
-
29
-
 30
30 -
 31
31 -
 32
32 -
 33
33 -
 34
34 -
 35
35 -
 36
36 -
 37
37 -
 38
38 -
 39
39 -
 40
40 -
41
-
42
-
43
-
44
-
45
-
46
-
47
-
48
-
49
-
50
-
51
-
52
-
53
-
54
-
55
-
56
-
57
-
58
-
59
-
60
-
61
-
62
-
63
-
64
-
65
-
66
-
67
-
68
-
69
-
70
-
71
-
72
-
73
-
74
-
75
-
76
-
77
-
78
-
79
-
80
-
81
-
82
-
83
-
84
-
85
-
86
-
87
-
88
-
89
-
90
-
91
-
92
-
93
-
94
-
95
-
96
-
97
-
98
-
99
-
100
-
101
-
102
-
103
 |
 |

Using Continuous Paper with Optional Push Tractor
4.
Adjust the right sprocket unit using the arrow mark on the case
and push down the lock lever to lock in place. (The arrow mark
indicates the first printable position.) Then slide the left sprocket
unit to match the width of your paper, but do not lock it.
5.
Position the paper support midway between the two sprocket
units. Open both sprocket covers.
2-8
Paper Handling