Epson ActionTower 8200 User Manual - Page 101
Replacing the Bracket in the Computer
 |
View all Epson ActionTower 8200 manuals
Add to My Manuals
Save this manual to your list of manuals |
Page 101 highlights
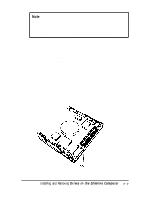
3. Secure the drive with the screws that came with it; you can use two or four screws, depending on the location of the holes in your drive. Replacing the Bracket in the Computer Follow these steps to replace the bracket in your computer: 1. Lower the bracket into the mounting area and slide it forward, inserting the front of the diskette drive through the drive slot in the front panel of the computer. 2. Make sure the holes in the bracket are aligned with the holes in the drive bay and brace. Then secure the bracket with the screws you removed previously. Installing and Removing Drives in the Slimline Computer 5-7
-
 1
1 -
2
-
3
-
4
-
5
-
6
-
7
-
8
-
9
-
10
-
11
-
12
-
13
-
14
-
15
-
16
-
17
-
18
-
19
-
20
-
21
-
22
-
23
-
24
-
25
-
26
-
27
-
28
-
29
-
30
-
31
-
32
-
33
-
34
-
35
-
36
-
37
-
38
-
39
-
40
-
41
-
42
-
43
-
44
-
45
-
46
-
47
-
48
-
49
-
50
-
51
-
52
-
53
-
54
-
55
-
56
-
57
-
58
-
59
-
60
-
61
-
62
-
63
-
64
-
65
-
66
-
67
-
68
-
69
-
70
-
71
-
72
-
73
-
74
-
75
-
76
-
77
-
78
-
79
-
80
-
81
-
82
-
83
-
84
-
85
-
86
-
87
-
88
-
89
-
90
-
91
-
92
-
93
-
94
-
95
-
 96
96 -
 97
97 -
 98
98 -
 99
99 -
 100
100 -
 101
101 -
 102
102 -
 103
103 -
 104
104 -
 105
105 -
 106
106 -
107
-
108
-
109
-
110
-
111
-
112
-
113
-
114
-
115
-
116
-
117
-
118
-
119
-
120
-
121
-
122
-
123
-
124
-
125
-
126
-
127
-
128
-
129
-
130
-
131
-
132
-
133
-
134
-
135
-
136
-
137
-
138
-
139
-
140
-
141
-
142
-
143
-
144
-
145
-
146
-
147
-
148
-
149
-
150
-
151
-
152
-
153
-
154
-
155
-
156
-
157
-
158
-
159
-
160
-
161
-
162
-
163
-
164
-
165
-
166
-
167
-
168
-
169
-
170
-
171
-
172
-
173
-
174
-
175
-
176
-
177
-
178
-
179
-
180
-
181
-
182
-
183
-
184
-
185
-
186
-
187
 |
 |

3.
Secure the drive with the screws that came with it; you can
use two or four screws, depending on the location of the
holes in your drive.
Replacing the Bracket in the Computer
Follow these steps to replace the bracket in your computer:
1.
Lower the bracket into the mounting area and slide it
forward, inserting the front of the diskette drive through
the drive slot in the front panel of the computer.
2.
Make sure the holes in the bracket are aligned with the holes
in the drive bay and brace. Then secure the bracket with the
screws you removed previously.
Installing and Removing Drives in the Slimline Computer
5-7