Epson ActionTower 8200 User Manual - Page 88
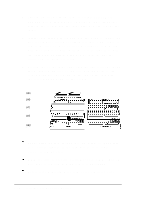
Installing External Cache, Your cache sockets may not look exactly like the ones in
 |
View all Epson ActionTower 8200 manuals
Add to My Manuals
Save this manual to your list of manuals |
Page 88 highlights
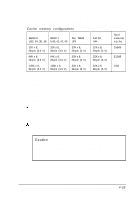
5. Repeat steps 3 and 4 to install the other chip. 6. Replace any option cards you removed; see "Installing an Option Card" for instructions. 7. Replace the computer's cover; see "Replacing the Cover." Then see "Post-installation Procedures" for instructions on configuring your new video memory. Installing External Cache Your computer has 256KB of external cache installed. You can expand your external cache to 512KB or 1MB with 64K x 8 or 128K x 8, 3.3 volt, 15ns SRAM DIP chips. Caution The only cache memory chips approved for use in your computer are 3.3 volt cache SRAM chips made by Alliance Semiconductor, ®do not install any other type of cache chip. Your cache sockets may not look exactly like the ones in the illustrations. If you're not sure how to install cache memory: contact your Authorized EPSON Servicer or the EPSON Connection and ask for assistance. Note If you have a tower computer, contact your Authorized EPSON Servicer to have them install external cache for you; do not install it yourself. 4-24 Installing and Removing Options
-
 1
1 -
2
-
3
-
4
-
5
-
6
-
7
-
8
-
9
-
10
-
11
-
12
-
13
-
14
-
15
-
16
-
17
-
18
-
19
-
20
-
21
-
22
-
23
-
24
-
25
-
26
-
27
-
28
-
29
-
30
-
31
-
32
-
33
-
34
-
35
-
36
-
37
-
38
-
39
-
40
-
41
-
42
-
43
-
44
-
45
-
46
-
47
-
48
-
49
-
50
-
51
-
52
-
53
-
54
-
55
-
56
-
57
-
58
-
59
-
60
-
61
-
62
-
63
-
64
-
65
-
66
-
67
-
68
-
69
-
70
-
71
-
72
-
73
-
74
-
75
-
76
-
77
-
78
-
79
-
80
-
81
-
82
-
 83
83 -
 84
84 -
 85
85 -
 86
86 -
 87
87 -
 88
88 -
 89
89 -
 90
90 -
 91
91 -
 92
92 -
 93
93 -
94
-
95
-
96
-
97
-
98
-
99
-
100
-
101
-
102
-
103
-
104
-
105
-
106
-
107
-
108
-
109
-
110
-
111
-
112
-
113
-
114
-
115
-
116
-
117
-
118
-
119
-
120
-
121
-
122
-
123
-
124
-
125
-
126
-
127
-
128
-
129
-
130
-
131
-
132
-
133
-
134
-
135
-
136
-
137
-
138
-
139
-
140
-
141
-
142
-
143
-
144
-
145
-
146
-
147
-
148
-
149
-
150
-
151
-
152
-
153
-
154
-
155
-
156
-
157
-
158
-
159
-
160
-
161
-
162
-
163
-
164
-
165
-
166
-
167
-
168
-
169
-
170
-
171
-
172
-
173
-
174
-
175
-
176
-
177
-
178
-
179
-
180
-
181
-
182
-
183
-
184
-
185
-
186
-
187
 |
 |
