Epson ActionTower 8200 User Manual - Page 91
Upgrading the Processor, Authorized EPSON Servicer or the EPSON Connection to ask
 |
View all Epson ActionTower 8200 manuals
Add to My Manuals
Save this manual to your list of manuals |
Page 91 highlights
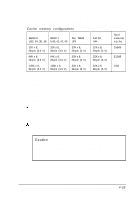
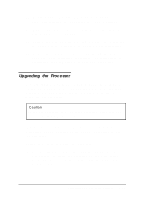
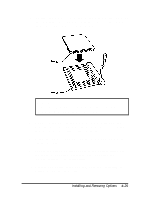
10. Change jumpers JPlO and JPll to match to the amount of cache you installed; see "Changing the Jumper Settings." 11. Replace any option cards you removed; see "Installing an Option Card" for instructions. 12. Replace the internal drive mounting bracket; see "Replacing the Bracket in the Computer" in Chapter 5 for instructions. 13. Replace the computer's cover; see "Replacing the Cover." Then see "Post-installation Procedures" for instructions on configuring your computer with your new cache size. Upgrading the Processor You can upgrade your processor with a faster one to improve system performance. If you upgrade the processor in the tower computer, you may want to lay the computer on its side to make the process easier. Caution If you are upgrading to a 100 MHz processor, make sure you use a standard 3.3 V processor. If you're not sure how to install a processor, contact your Authorized EPSON Servicer or the EPSON Connection to ask for assistance. Follow these steps to replace the processor: 1. Use the illustration under "Locating the System Board Components" to locate the processor on the main system board. The processor is inserted in a ZIF (Zero Insertion Force) socket. Installing and Removing Options 4-27
-
 1
1 -
2
-
3
-
4
-
5
-
6
-
7
-
8
-
9
-
10
-
11
-
12
-
13
-
14
-
15
-
16
-
17
-
18
-
19
-
20
-
21
-
22
-
23
-
24
-
25
-
26
-
27
-
28
-
29
-
30
-
31
-
32
-
33
-
34
-
35
-
36
-
37
-
38
-
39
-
40
-
41
-
42
-
43
-
44
-
45
-
46
-
47
-
48
-
49
-
50
-
51
-
52
-
53
-
54
-
55
-
56
-
57
-
58
-
59
-
60
-
61
-
62
-
63
-
64
-
65
-
66
-
67
-
68
-
69
-
70
-
71
-
72
-
73
-
74
-
75
-
76
-
77
-
78
-
79
-
80
-
81
-
82
-
83
-
84
-
85
-
 86
86 -
 87
87 -
 88
88 -
 89
89 -
 90
90 -
 91
91 -
 92
92 -
 93
93 -
 94
94 -
 95
95 -
 96
96 -
97
-
98
-
99
-
100
-
101
-
102
-
103
-
104
-
105
-
106
-
107
-
108
-
109
-
110
-
111
-
112
-
113
-
114
-
115
-
116
-
117
-
118
-
119
-
120
-
121
-
122
-
123
-
124
-
125
-
126
-
127
-
128
-
129
-
130
-
131
-
132
-
133
-
134
-
135
-
136
-
137
-
138
-
139
-
140
-
141
-
142
-
143
-
144
-
145
-
146
-
147
-
148
-
149
-
150
-
151
-
152
-
153
-
154
-
155
-
156
-
157
-
158
-
159
-
160
-
161
-
162
-
163
-
164
-
165
-
166
-
167
-
168
-
169
-
170
-
171
-
172
-
173
-
174
-
175
-
176
-
177
-
178
-
179
-
180
-
181
-
182
-
183
-
184
-
185
-
186
-
187
 |
 |
