Epson ActionTower 8200 User Manual - Page 102
Connecting the Hard Disk Drive Cables, Locating the System Board Components in
 |
View all Epson ActionTower 8200 manuals
Add to My Manuals
Save this manual to your list of manuals |
Page 102 highlights
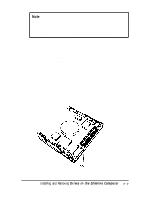
Connecting the Hard Disk Drive Cables After you replace the bracket, you need to connect the cables to the hard disk drive. Follow these steps: 1. Locate one of the IDE device cables that are connected to the IDE interfaces on the system board. They are flat cables with a connector at one end and two IDE device connectors at the other end. A red wire is on one side of the cable. (See "Locating the System Board Components" in Chapter 4 to find the primary and secondary IDE interfaces on the system board.) system board connector IDE device connectors red wire Use the primary IDE interface for your boot drive and your second hard disk drive; use the secondary IDE interface to connect IDE CD-ROM drives, other IDE devices, or your third and fourth hard disk drives. You cannot connect a CD-ROM drive and hard disk drive to the same interface. 2. Identify the IDE device connector you will use on the IDE device cable. 3. Locate pin 1 on the drive connector. If you do not see it on the connector casing and you did not locate it before you replaced the drive bracket, you may have to remove the drive and turn it over to check the circuit board. 5-8 Installing and Removing Drives in the Slimline Computer
-
 1
1 -
2
-
3
-
4
-
5
-
6
-
7
-
8
-
9
-
10
-
11
-
12
-
13
-
14
-
15
-
16
-
17
-
18
-
19
-
20
-
21
-
22
-
23
-
24
-
25
-
26
-
27
-
28
-
29
-
30
-
31
-
32
-
33
-
34
-
35
-
36
-
37
-
38
-
39
-
40
-
41
-
42
-
43
-
44
-
45
-
46
-
47
-
48
-
49
-
50
-
51
-
52
-
53
-
54
-
55
-
56
-
57
-
58
-
59
-
60
-
61
-
62
-
63
-
64
-
65
-
66
-
67
-
68
-
69
-
70
-
71
-
72
-
73
-
74
-
75
-
76
-
77
-
78
-
79
-
80
-
81
-
82
-
83
-
84
-
85
-
86
-
87
-
88
-
89
-
90
-
91
-
92
-
93
-
94
-
95
-
96
-
 97
97 -
 98
98 -
 99
99 -
 100
100 -
 101
101 -
 102
102 -
 103
103 -
 104
104 -
 105
105 -
 106
106 -
 107
107 -
108
-
109
-
110
-
111
-
112
-
113
-
114
-
115
-
116
-
117
-
118
-
119
-
120
-
121
-
122
-
123
-
124
-
125
-
126
-
127
-
128
-
129
-
130
-
131
-
132
-
133
-
134
-
135
-
136
-
137
-
138
-
139
-
140
-
141
-
142
-
143
-
144
-
145
-
146
-
147
-
148
-
149
-
150
-
151
-
152
-
153
-
154
-
155
-
156
-
157
-
158
-
159
-
160
-
161
-
162
-
163
-
164
-
165
-
166
-
167
-
168
-
169
-
170
-
171
-
172
-
173
-
174
-
175
-
176
-
177
-
178
-
179
-
180
-
181
-
182
-
183
-
184
-
185
-
186
-
187
 |
 |
