Epson ActionTower 8200 User Manual - Page 99
Installing a Hard Disk Drive in the Mounting Brake 1
 |
View all Epson ActionTower 8200 manuals
Add to My Manuals
Save this manual to your list of manuals |
Page 99 highlights
3. Remove the screws securing the bracket to the drive bay and brace. (Save the screws for later use.) 4. Slide the bracket away from the front of the computer and lift it out. Installing a Hard Disk Drive in the Mounting Bracket You can install a new hard disk drive below the diskette drive in the mounting bracket, once you have removed the bracket from the computer. To fit into this space, your hard disk drive must be 1 inch high by 3.5 inches wide. If you have a larger hard disk drive, you can install it in one of the external drive bays; see "Installing a Drive in an External Drive Bay" for instructions. Installing and Removing Drives in the Slimline Computer 5-5
-
 1
1 -
2
-
3
-
4
-
5
-
6
-
7
-
8
-
9
-
10
-
11
-
12
-
13
-
14
-
15
-
16
-
17
-
18
-
19
-
20
-
21
-
22
-
23
-
24
-
25
-
26
-
27
-
28
-
29
-
30
-
31
-
32
-
33
-
34
-
35
-
36
-
37
-
38
-
39
-
40
-
41
-
42
-
43
-
44
-
45
-
46
-
47
-
48
-
49
-
50
-
51
-
52
-
53
-
54
-
55
-
56
-
57
-
58
-
59
-
60
-
61
-
62
-
63
-
64
-
65
-
66
-
67
-
68
-
69
-
70
-
71
-
72
-
73
-
74
-
75
-
76
-
77
-
78
-
79
-
80
-
81
-
82
-
83
-
84
-
85
-
86
-
87
-
88
-
89
-
90
-
91
-
92
-
93
-
 94
94 -
 95
95 -
 96
96 -
 97
97 -
 98
98 -
 99
99 -
 100
100 -
 101
101 -
 102
102 -
 103
103 -
 104
104 -
105
-
106
-
107
-
108
-
109
-
110
-
111
-
112
-
113
-
114
-
115
-
116
-
117
-
118
-
119
-
120
-
121
-
122
-
123
-
124
-
125
-
126
-
127
-
128
-
129
-
130
-
131
-
132
-
133
-
134
-
135
-
136
-
137
-
138
-
139
-
140
-
141
-
142
-
143
-
144
-
145
-
146
-
147
-
148
-
149
-
150
-
151
-
152
-
153
-
154
-
155
-
156
-
157
-
158
-
159
-
160
-
161
-
162
-
163
-
164
-
165
-
166
-
167
-
168
-
169
-
170
-
171
-
172
-
173
-
174
-
175
-
176
-
177
-
178
-
179
-
180
-
181
-
182
-
183
-
184
-
185
-
186
-
187
 |
 |

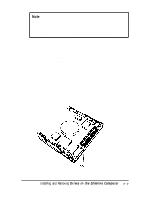
3.
Remove the screws securing the bracket to the drive bay and
brace. (Save the screws for later use.)
4.
Slide the bracket away from the front of the computer and
lift it out.
Installing a Hard Disk Drive in the Mounting
Bracket
You can install a new hard disk drive below the diskette drive
in the mounting bracket, once you have removed the bracket
from the computer. To fit into this space, your hard disk drive
must be 1 inch high by 3.5 inches wide. If you have a larger
hard disk drive, you can install it in one of the external drive
bays; see “Installing a Drive in an External Drive Bay” for
instructions.
Installing and Removing Drives in the Slimline Computer
5-5