Epson ActionTower 8200 User Manual - Page 35
Individual drive options, IDE Adapter 0 Master, Autotype Fixed Disk, Multi-Sector Transfer
 |
View all Epson ActionTower 8200 manuals
Add to My Manuals
Save this manual to your list of manuals |
Page 35 highlights
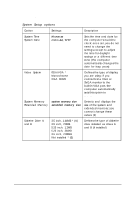
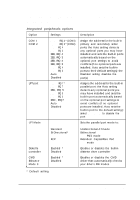
From this screen, you can configure each of the installed drives using these options: IDE Adapter 0 Master IDE Adapter 0 Slave IDE Adapter 1 Master IDE Adapter 1 Slave The IDE Adapter 0 drives are the master and slave drives connected to your primary IDE interface. The IDE Adapter 1 drives are connected to the secondary IDE interface. (The computer detects the master and slave status of the drives based on the drive's jumper settings, described in Chapters 5 and 6.) Individual drive options Your computer comes with a hard disk auto-sensing feature. To use it, select one of the drives you have installed from the Fixed Disk Setup screen. On the screen that appears for that drive, press Enter to select the Autotype Fixed Disk option. The system detects the type of hard disk drive, fills in the drive's parameters, and sets the remaining options on the screen. Some older drives may not support the auto-sensing feature. If the drive parameters displayed on the screen do not match your drive, you need to define your own drive parameters (see the next section for instructions). You may also need to set the remaining options on the screen, as described below. The Multi-Sector Transfer option sets the number of sectors per block that the hard disk uses in multiple sector transfers. The more sector transfers per block, the faster your hard drive performs. If this option is not automatically detected, you can select 2, 4, 8, or 16 sectors. 2-6 Running SETUP and Installing Drivers
-
 1
1 -
2
-
3
-
4
-
5
-
6
-
7
-
8
-
9
-
10
-
11
-
12
-
13
-
14
-
15
-
16
-
17
-
18
-
19
-
20
-
21
-
22
-
23
-
24
-
25
-
26
-
27
-
28
-
29
-
 30
30 -
 31
31 -
 32
32 -
 33
33 -
 34
34 -
 35
35 -
 36
36 -
 37
37 -
 38
38 -
 39
39 -
 40
40 -
41
-
42
-
43
-
44
-
45
-
46
-
47
-
48
-
49
-
50
-
51
-
52
-
53
-
54
-
55
-
56
-
57
-
58
-
59
-
60
-
61
-
62
-
63
-
64
-
65
-
66
-
67
-
68
-
69
-
70
-
71
-
72
-
73
-
74
-
75
-
76
-
77
-
78
-
79
-
80
-
81
-
82
-
83
-
84
-
85
-
86
-
87
-
88
-
89
-
90
-
91
-
92
-
93
-
94
-
95
-
96
-
97
-
98
-
99
-
100
-
101
-
102
-
103
-
104
-
105
-
106
-
107
-
108
-
109
-
110
-
111
-
112
-
113
-
114
-
115
-
116
-
117
-
118
-
119
-
120
-
121
-
122
-
123
-
124
-
125
-
126
-
127
-
128
-
129
-
130
-
131
-
132
-
133
-
134
-
135
-
136
-
137
-
138
-
139
-
140
-
141
-
142
-
143
-
144
-
145
-
146
-
147
-
148
-
149
-
150
-
151
-
152
-
153
-
154
-
155
-
156
-
157
-
158
-
159
-
160
-
161
-
162
-
163
-
164
-
165
-
166
-
167
-
168
-
169
-
170
-
171
-
172
-
173
-
174
-
175
-
176
-
177
-
178
-
179
-
180
-
181
-
182
-
183
-
184
-
185
-
186
-
187
 |
 |
