Epson BrightLink 436Wi Installation Guide - Page 14
Positioning the Projector
 |
View all Epson BrightLink 436Wi manuals
Add to My Manuals
Save this manual to your list of manuals |
Page 14 highlights
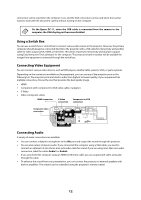
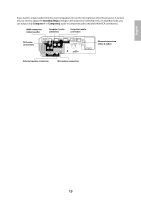
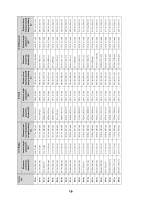
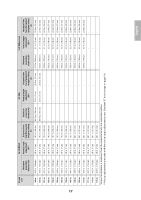
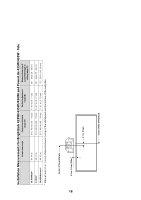
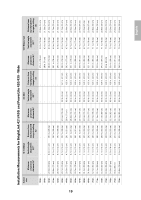
4 Positioning the Projector BrightLink 425Wi/435Wi/436Wi and PowerLite 425W/435W can project up to 113 inches diagonally for a WXGA image or 100 inches diagonally for an XGA image. BrightLink 421i/430i and PowerLite 420/430 can project up to 106 inches diagonally for an XGA image. You can project onto a pre-installed whiteboard or directly onto a plain wall. The height of the included wall mount determines how high the image appears on the wall or whiteboard. The distance of the projector from the wall (once it is mounted on the adjustable arm of the wall mount) also affects image size and position. If you are planning to project on a whiteboard, the image may not fill the entire board, depending on the aspect ratio. If you match the image height to the board's height, gaps may appear on the sides of the board. Refer to the tables on the following pages and install the mount and projector to project images at the appropriate size. The values are only a guide. The recommended projection distance is 27.6 to 46.9 inches (70 to 119 cm). A: Minimum projection distance B: Vertical angle adjustment C: Distance from top of image to ceiling C B Center of lens A A: Vertical tilt adjustment: 0 to -9.5° B: Horizontal roll adjustment: 0 to ± 5° C: Horizontal rotation adjustment: 0 to ± 5° D: Horizontal slide adjustment: 0 to ± 1.8 inches (0 to ± 45 mm) E: Vertical angle adjustment screw: 0 to 5.3 inches (0 to 134 mm) (arm length minimum) 0 to 9.1 inches (0 to 230 mm) (arm length maximum) Adjustment unit Projected image Arm plate 14
-
 1
1 -
2
-
3
-
4
-
5
-
6
-
7
-
8
-
 9
9 -
 10
10 -
 11
11 -
 12
12 -
 13
13 -
 14
14 -
 15
15 -
 16
16 -
 17
17 -
 18
18 -
 19
19 -
20
-
21
-
22
-
23
-
24
-
25
-
26
-
27
-
28
-
29
-
30
-
31
-
32
-
33
-
34
-
35
-
36
-
37
-
38
-
39
-
40
-
41
-
42
-
43
-
44
-
45
-
46
-
47
-
48
-
49
-
50
-
51
-
52
-
53
-
54
-
55
-
56
-
57
-
58
-
59
-
60
-
61
-
62
-
63
-
64
-
65
-
66
-
67
-
68
-
69
-
70
-
71
-
72
 |
 |
