Epson BrightLink 436Wi Installation Guide - Page 31
Connect the power cord and other cables to the projector, Attach the interactive module
 |
View all Epson BrightLink 436Wi manuals
Add to My Manuals
Save this manual to your list of manuals |
Page 31 highlights
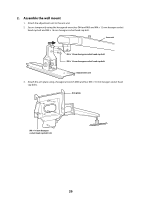
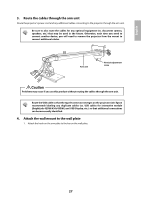
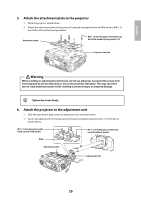
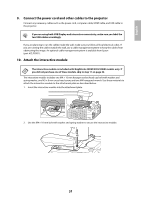
English 9. Connect the power cord and other cables to the projector Connect any necessary cables such as the power cord, computer cable, HDMI cable, and USB cable to the projector. q If you are using both USB Display and interactive connectivity, make sure you label the two USB cables accordingly. If you are planning to run the cables inside the wall, make sure you follow all local electrical codes. If you are running the cables outside the wall, use a cable management system to keep the cables from obstructing the image. An optional cable management system is available from Epson (part # ELPCK01). 10. Attach the interactive module The interactive module is included with BrightLink 425Wi/430i/435Wi models only. If you did not purchase one of these models, skip to step 11 on page 32. The interactive module includes one M4 × 10 mm hexagon socket head cap bolt with washer and spring washer, one M3 × 8 mm cross-head screw, and one M4 hexagonal wrench. Use these materials to attach the interactive module to the attachment plate as described below. 1. Insert the interactive module into the attachment plate. 2. Use the M4 × 10 mm bolt with washer and spring washer to secure the interactive module. 31
-
 1
1 -
2
-
3
-
4
-
5
-
6
-
7
-
8
-
9
-
10
-
11
-
12
-
13
-
14
-
15
-
16
-
17
-
18
-
19
-
20
-
21
-
22
-
23
-
24
-
25
-
 26
26 -
 27
27 -
 28
28 -
 29
29 -
 30
30 -
 31
31 -
 32
32 -
 33
33 -
 34
34 -
 35
35 -
 36
36 -
37
-
38
-
39
-
40
-
41
-
42
-
43
-
44
-
45
-
46
-
47
-
48
-
49
-
50
-
51
-
52
-
53
-
54
-
55
-
56
-
57
-
58
-
59
-
60
-
61
-
62
-
63
-
64
-
65
-
66
-
67
-
68
-
69
-
70
-
71
-
72
 |
 |
