Epson CX6400 Quick Reference Guide - Page 26
Selecting Photos to Print, Selecting Photos with the Index Form - printers
 |
UPC - 013438468694
View all Epson CX6400 manuals
Add to My Manuals
Save this manual to your list of manuals |
Page 26 highlights
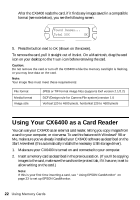
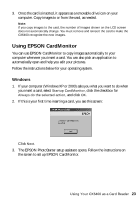
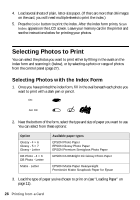
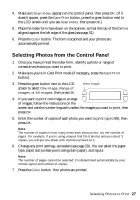
4. Load several sheets of plain, letter-size paper. (If there are more than 36 images on the card, you will need multiple sheets to print the index.) 5. Press the Color button to print the index. After the index form prints, Scan Index appears on the LCD screen. Leave your memory card in the printer and see the instructions below for printing your photos. Selecting Photos to Print You can select the photos you want to print either by filling in the ovals on the index form and scanning it (below), or by selecting a photo or range of photos from the control panel (page 27). Selecting Photos with the Index Form 1. Once you have printed the index form, fill in the oval beneath each photo you want to print with a dark pen or pencil. OK: Not OK: 2. Near the bottom of the form, select the type and size of paper you want to use. You can select from these options: Option Glossy - 4 × 6 Glossy - 5 × 7 Glossy - Letter DB Photo - 4 × 6 DB Photo - Letter Matte - Letter Available paper types EPSON Photo Paper EPSON Glossy Photo Paper EPSON Premium Semigloss Photo Paper EPSON DURABright Ink Glossy Photo Paper EPSON Matte Paper Heavyweight PremierArt Matte Scrapbook Paper for Epson 3. Load the type of paper you've chosen to print on (see "Loading Paper" on page 11). 26 Printing from a Card
-
 1
1 -
2
-
3
-
4
-
5
-
6
-
7
-
8
-
9
-
10
-
11
-
12
-
13
-
14
-
15
-
16
-
17
-
18
-
19
-
20
-
 21
21 -
 22
22 -
 23
23 -
 24
24 -
 25
25 -
 26
26 -
 27
27 -
 28
28 -
 29
29 -
 30
30 -
 31
31 -
32
-
33
-
34
-
35
-
36
-
37
-
38
-
39
-
40
-
41
-
42
-
43
-
44
-
45
-
46
-
47
-
48
-
49
-
50
-
51
-
52
 |
 |