Epson CX6400 Quick Reference Guide - Page 32
Scanning to a Card, of your document are light in color, - parts
 |
UPC - 013438468694
View all Epson CX6400 manuals
Add to My Manuals
Save this manual to your list of manuals |
Page 32 highlights
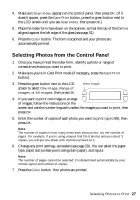
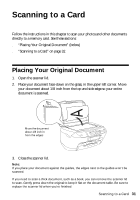
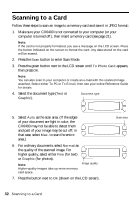
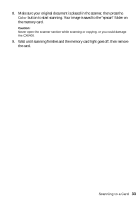
Scanning to a Card Follow these steps to scan an image to a memory card and save it in JPEG format: 1. Make sure your CX6400 is not connected to your computer (or your computer is turned off ), then insert a memory card (see page 21). Note: If the card is not properly formatted, you see a message on the LCD screen. Press the button indicated on the screen to format the card. Any data stored on the card will be erased. 2. Press the Scan button to enter Scan Mode. 3. Press the green button next to the LCD screen until To Photo Card appears, then press OK. Note: You can also scan to your computer or create an e-mail with the scanned image attached. Select either To PC or To E-mail, then see your online Reference Guide for details. 4. Select the document type (Text or Graphic). Document type 5. Select Auto as the scan area. (If the edges of your document are light in color, the CX6400 may not be able to detect them and part of your image may be cut off; in that case, select Max. to scan the entire area.) 6. For ordinary documents, select Normal as the quality of the scanned image. For higher quality, select either Fine (for text) or Graphic (for photos). Note: Image quality Higher-quality images take up more memory card space. 7. Press the button next to OK (shown on the LCD screen). 32 Scanning to a Card Scan area
-
 1
1 -
2
-
3
-
4
-
5
-
6
-
7
-
8
-
9
-
10
-
11
-
12
-
13
-
14
-
15
-
16
-
17
-
18
-
19
-
20
-
21
-
22
-
23
-
24
-
25
-
26
-
 27
27 -
 28
28 -
 29
29 -
 30
30 -
 31
31 -
 32
32 -
 33
33 -
 34
34 -
 35
35 -
 36
36 -
 37
37 -
38
-
39
-
40
-
41
-
42
-
43
-
44
-
45
-
46
-
47
-
48
-
49
-
50
-
51
-
52
 |
 |