Epson PictureMate Pal - PM 200 Basics - Page 18
The installer installs your PictureMate Pal software., When you see the screen below, click
 |
View all Epson PictureMate Pal - PM 200 manuals
Add to My Manuals
Save this manual to your list of manuals |
Page 18 highlights
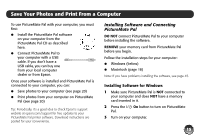
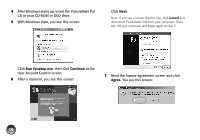
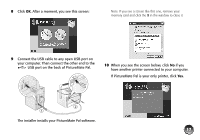
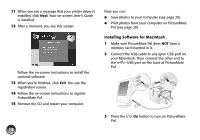
8 Click OK. After a moment, you see this screen: Note: If you see a screen like this one, remove your memory card and click the X in the window to close it. 9 Connect the USB cable to any open USB port on your computer. Then connect the other end to the USB port on the back of PictureMate Pal. 10 When you see the screen below, click No if you have another printer connected to your computer. If PictureMate Pal is your only printer, click Yes. The installer installs your PictureMate Pal software. 17
-
 1
1 -
2
-
3
-
4
-
5
-
6
-
7
-
8
-
9
-
10
-
11
-
12
-
 13
13 -
 14
14 -
 15
15 -
 16
16 -
 17
17 -
 18
18 -
 19
19 -
 20
20 -
 21
21 -
 22
22 -
 23
23 -
24
-
25
-
26
-
27
-
28
-
29
-
30
-
31
-
32
-
33
-
34
-
35
-
36
-
37
-
38
-
39
-
40
-
41
-
42
-
43
-
44
-
45
-
46
-
47
-
48
-
49
-
50
-
51
-
52
-
53
-
54
-
55
-
56
-
57
-
58
-
59
-
60
-
61
-
62
-
63
-
64
-
65
-
66
-
67
-
68
-
69
-
70
 |
 |

17
8
Click
OK
. After a moment, you see this screen:
9
Connect the USB cable to any open USB port on
your computer. Then connect the other end to the
USB port on the back of PictureMate Pal.
The installer installs your PictureMate Pal software.
Note: If you see a screen like this one, remove your
memory card and click the
X
in the window to close it.
10
When you see the screen below, click
No
if you
have another printer connected to your computer.
If PictureMate Pal is your only printer, click
Yes
.