Epson PowerLite 5300 User Manual - Page 122
Open the File, Select Area, window reappears.
 |
View all Epson PowerLite 5300 manuals
Add to My Manuals
Save this manual to your list of manuals |
Page 122 highlights
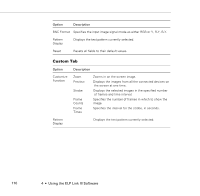
2. Click the Edit button. The following window appears. 3. Click the Open the File icon to locate and open a bitmap (or TIFF, JPG, PSO) file. The selected image appears in the display area. 4. To crop the image, click the Select Area button and position the crop marks. Click OK to accept the changes. The User's Logo window reappears. 5. To increase or decrease the size at which the logo displays, select a zoom percentage from the Zoom list box. 6. Click the Save button to save your logo to your hard disk. The Save As dialog box appears. Note: You must save logo files with the extension .lgo. 114 4 • Using the ELP Link III Software
-
 1
1 -
2
-
3
-
4
-
5
-
6
-
7
-
8
-
9
-
10
-
11
-
12
-
13
-
14
-
15
-
16
-
17
-
18
-
19
-
20
-
21
-
22
-
23
-
24
-
25
-
26
-
27
-
28
-
29
-
30
-
31
-
32
-
33
-
34
-
35
-
36
-
37
-
38
-
39
-
40
-
41
-
42
-
43
-
44
-
45
-
46
-
47
-
48
-
49
-
50
-
51
-
52
-
53
-
54
-
55
-
56
-
57
-
58
-
59
-
60
-
61
-
62
-
63
-
64
-
65
-
66
-
67
-
68
-
69
-
70
-
71
-
72
-
73
-
74
-
75
-
76
-
77
-
78
-
79
-
80
-
81
-
82
-
83
-
84
-
85
-
86
-
87
-
88
-
89
-
90
-
91
-
92
-
93
-
94
-
95
-
96
-
97
-
98
-
99
-
100
-
101
-
102
-
103
-
104
-
105
-
106
-
107
-
108
-
109
-
110
-
111
-
112
-
113
-
114
-
115
-
116
-
 117
117 -
 118
118 -
 119
119 -
 120
120 -
 121
121 -
 122
122 -
 123
123 -
 124
124 -
 125
125 -
 126
126 -
 127
127 -
128
-
129
-
130
-
131
-
132
-
133
-
134
-
135
-
136
-
137
-
138
-
139
-
140
-
141
-
142
-
143
-
144
-
145
-
146
-
147
-
148
-
149
-
150
-
151
-
152
-
153
-
154
 |
 |

4
•
Using the ELP Link III Software
114
2.
Click the
Edit
button. The following window appears.
3.
Click the
Open the File
icon to locate and open a bitmap (or
TIFF, JPG, PSO) file. The selected image appears in the display
area.
4.
To crop the image, click the
Select Area
button and position the
crop marks. Click
OK
to accept the changes. The User’s Logo
window reappears.
5.
To increase or decrease the size at which the logo displays, select a
zoom percentage from the Zoom list box.
6.
Click the
Save
button to save your logo to your hard disk. The
Save As dialog box appears.
Note:
You must save logo files with the extension .lgo.