Epson TM-m50II Technical Reference Guide - Page 89
Attaching the Printer Covers, For Ejecting Paper Upward
 |
View all Epson TM-m50II manuals
Add to My Manuals
Save this manual to your list of manuals |
Page 89 highlights
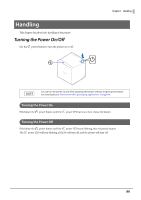
Chapter 5 Handling Attaching the Printer Covers Depending on attachment positions of the rear and bottom covers, paper eject direction changes. Decide from which way to eject paper according to the installation location of the printer. Follow the steps below to attach the printer covers. When you pass power or interface cables through the left, right, or bottom of the printer, the cable slot cover will help keep the back of the printer flat and neat looking. See "Routing Cables in Various Directions" on page 47 for instructions on how to install the cable slot cover and route the cables. For Ejecting Paper Upward 1 Align the catches and attach the bottom cover to the printer. 2 Hook the catches into the bottom cover and attach the rear cover to the printer. 89
-
 1
1 -
2
-
3
-
4
-
5
-
6
-
7
-
8
-
9
-
10
-
11
-
12
-
13
-
14
-
15
-
16
-
17
-
18
-
19
-
20
-
21
-
22
-
23
-
24
-
25
-
26
-
27
-
28
-
29
-
30
-
31
-
32
-
33
-
34
-
35
-
36
-
37
-
38
-
39
-
40
-
41
-
42
-
43
-
44
-
45
-
46
-
47
-
48
-
49
-
50
-
51
-
52
-
53
-
54
-
55
-
56
-
57
-
58
-
59
-
60
-
61
-
62
-
63
-
64
-
65
-
66
-
67
-
68
-
69
-
70
-
71
-
72
-
73
-
74
-
75
-
76
-
77
-
78
-
79
-
80
-
81
-
82
-
83
-
 84
84 -
 85
85 -
 86
86 -
 87
87 -
 88
88 -
 89
89 -
 90
90 -
 91
91 -
 92
92 -
 93
93 -
 94
94 -
95
-
96
-
97
-
98
-
99
-
100
-
101
-
102
-
103
-
104
-
105
-
106
-
107
-
108
-
109
-
110
-
111
-
112
-
113
-
114
-
115
-
116
-
117
-
118
-
119
-
120
-
121
-
122
-
123
-
124
-
125
-
126
-
127
-
128
-
129
-
130
-
131
-
132
-
133
 |
 |
