Fluke Ti200 Manual - Page 19
Primary and Secondary Triggers, Focus - parts
 |
View all Fluke Ti200 manuals
Add to My Manuals
Save this manual to your list of manuals |
Page 19 highlights
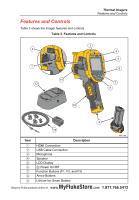
Thermal Imagers Primary and Secondary Triggers Primary and Secondary Triggers The two-part trigger is located in the standard trigger position for a pistol-grip device. The larger, green trigger is the primary trigger. The smaller, black trigger is the secondary trigger. In normal operation, the function of the primary trigger is to capture a thermal image for possible storage to memory by the user. The secondary trigger operates the LaserSharp™ Auto Focus System and laser pointer. See page 32 for information about how to enable and disable the LaserSharp™ Auto Focus System. Focus The Imager uses the LaserSharp Auto Focus System and an advanced manual focus system. Correct focus is important in all imaging applications. Correct focus makes sure that the infrared energy is correctly directed onto the pixels of the detector. Without correct focus, the thermal image can be blurry and the radiometric data may be inaccurate. Out-of-focus infrared images are frequently unusable or of little value. The LaserSharp Auto Focus System, only from Fluke, uses a precisionadjusted and aligned laser pointer to indicate the area of focus. To focus with the LaserSharp Auto Focus System, depress the secondary (black) trigger on the Imager handle. Aim the laser pointer at the target. When satisfied with the location of the laser pointer, release the trigger. The system automatically, rapidly, and reliably focuses on the precise point where the laser was aimed. Note • The user can enable and disable the LaserSharp Auto Focus System. • The laser pointer is aligned parallel to the infrared lens. If using AutoBlend Mode, the laser pointer dot will always be positioned just above the center point marker on the LCD display. However, it is easier to use your eyes to locate the visible laser pointer on the object under inspection. To focus with the advanced manual focus system, place finger on the electronically-driven focus wheel control and rotate the control until the inspection object is in proper focus. MyFlukeStore Shop for Fluke products online at: www. .com 1.877.766.541132
-
 1
1 -
2
-
3
-
4
-
5
-
6
-
7
-
8
-
9
-
10
-
11
-
12
-
13
-
 14
14 -
 15
15 -
 16
16 -
 17
17 -
 18
18 -
 19
19 -
 20
20 -
 21
21 -
 22
22 -
 23
23 -
 24
24 -
25
-
26
-
27
-
28
-
29
-
30
-
31
-
32
-
33
-
34
-
35
-
36
-
37
-
38
-
39
-
40
-
41
-
42
-
43
-
44
-
45
-
46
-
47
-
48
-
49
-
50
-
51
-
52
-
53
-
54
 |
 |
