HP 6125XLG R2306-HP 6125XLG Blade Switch Layer 3 - IP Routing Configuration Gu - Page 139
Setting the LSDB overload bit, Configuring system ID to host name mappings
 |
View all HP 6125XLG manuals
Add to My Manuals
Save this manual to your list of manuals |
Page 139 highlights
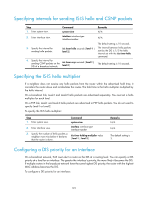
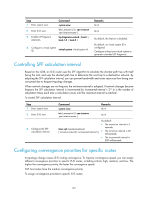
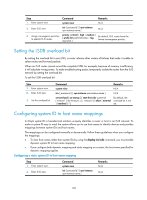
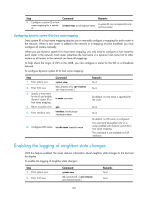
Step 1. Enter system view. Command system-view Remarks N/A 2. Enter IS-IS view. isis [ process-id ] [ vpn-instance vpn-instance-name ] N/A 3. Assign convergence priorities to specific IS-IS routes. priority { critical | high | medium } { prefix-list prefix-list-name | tag tag-value } By default, IS-IS routes have the lowest convergence priority. Setting the LSDB overload bit By setting the overload bit in sent LSPs, a router informs other routers of failures that make it unable to select routes and forward packets. When an IS-IS router cannot record the complete LSDB, for example, because of memory insufficiency, it will calculate wrong routes. To make troubleshooting easier, temporarily isolate the router from the IS-IS network by setting the overload bit. To set the LSDB overload bit: Step 1. Enter system view. 2. Enter IS-IS view. 3. Set the overload bit. Command Remarks system-view N/A isis [ process-id ] [ vpn-instance vpn-instance-name ] N/A set-overload [ on-startup [ [ start-from-nbr system-id By default, the [ timeout1 [ nbr-timeout ] ] ] | timeout2 ] [ allow { external overload bit is not | interlevel } * ] set. Configuring system ID to host name mappings A 6-byte system ID in hexadecimal notation uniquely identifies a router or host in an IS-IS network. To make a system ID easy to read, the system allows you to use host names to identify devices and provides mappings between system IDs and host names. The mappings can be configured manually or dynamically. Follow these guidelines when you configure the mappings: • To view host names rather than system IDs by using the display isis lsdb command, you must enable dynamic system ID to host name mapping. • If you configure both dynamic mapping and static mapping on a router, the host name specified for dynamic mapping applies. Configuring a static system ID to host name mapping Step 1. Enter system view. 2. Enter IS-IS view. Command system-view isis [ process-id ] [ vpn-instance vpn-instance-name ] Remarks N/A N/A 128
-
 1
1 -
2
-
3
-
4
-
5
-
6
-
7
-
8
-
9
-
10
-
11
-
12
-
13
-
14
-
15
-
16
-
17
-
18
-
19
-
20
-
21
-
22
-
23
-
24
-
25
-
26
-
27
-
28
-
29
-
30
-
31
-
32
-
33
-
34
-
35
-
36
-
37
-
38
-
39
-
40
-
41
-
42
-
43
-
44
-
45
-
46
-
47
-
48
-
49
-
50
-
51
-
52
-
53
-
54
-
55
-
56
-
57
-
58
-
59
-
60
-
61
-
62
-
63
-
64
-
65
-
66
-
67
-
68
-
69
-
70
-
71
-
72
-
73
-
74
-
75
-
76
-
77
-
78
-
79
-
80
-
81
-
82
-
83
-
84
-
85
-
86
-
87
-
88
-
89
-
90
-
91
-
92
-
93
-
94
-
95
-
96
-
97
-
98
-
99
-
100
-
101
-
102
-
103
-
104
-
105
-
106
-
107
-
108
-
109
-
110
-
111
-
112
-
113
-
114
-
115
-
116
-
117
-
118
-
119
-
120
-
121
-
122
-
123
-
124
-
125
-
126
-
127
-
128
-
129
-
130
-
131
-
132
-
133
-
 134
134 -
 135
135 -
 136
136 -
 137
137 -
 138
138 -
 139
139 -
 140
140 -
 141
141 -
 142
142 -
 143
143 -
 144
144 -
145
-
146
-
147
-
148
-
149
-
150
-
151
-
152
-
153
-
154
-
155
-
156
-
157
-
158
-
159
-
160
-
161
-
162
-
163
-
164
-
165
-
166
-
167
-
168
-
169
-
170
-
171
-
172
-
173
-
174
-
175
-
176
-
177
-
178
-
179
-
180
-
181
-
182
-
183
-
184
-
185
-
186
-
187
-
188
-
189
-
190
-
191
-
192
-
193
-
194
-
195
-
196
-
197
-
198
-
199
-
200
-
201
-
202
-
203
-
204
-
205
-
206
-
207
-
208
-
209
-
210
-
211
-
212
-
213
-
214
-
215
-
216
-
217
-
218
-
219
-
220
-
221
-
222
-
223
-
224
-
225
-
226
-
227
-
228
-
229
-
230
-
231
-
232
-
233
-
234
-
235
-
236
-
237
-
238
-
239
-
240
-
241
-
242
-
243
-
244
-
245
-
246
-
247
-
248
-
249
-
250
-
251
-
252
-
253
-
254
-
255
-
256
-
257
-
258
-
259
-
260
-
261
-
262
-
263
-
264
-
265
-
266
-
267
-
268
-
269
-
270
-
271
-
272
-
273
-
274
-
275
-
276
-
277
-
278
-
279
-
280
-
281
-
282
-
283
-
284
-
285
-
286
-
287
-
288
-
289
-
290
-
291
-
292
-
293
-
294
-
295
-
296
-
297
-
298
-
299
-
300
-
301
-
302
-
303
-
304
-
305
-
306
-
307
-
308
-
309
-
310
-
311
-
312
-
313
-
314
-
315
-
316
-
317
-
318
-
319
-
320
-
321
-
322
-
323
-
324
-
325
-
326
-
327
-
328
-
329
-
330
-
331
-
332
-
333
-
334
-
335
-
336
-
337
-
338
-
339
-
340
-
341
-
342
-
343
-
344
-
345
-
346
-
347
-
348
-
349
-
350
-
351
-
352
-
353
-
354
-
355
-
356
-
357
-
358
-
359
-
360
-
361
-
362
-
363
-
364
-
365
-
366
-
367
-
368
-
369
-
370
-
371
-
372
-
373
-
374
-
375
-
376
-
377
-
378
-
379
-
380
-
381
-
382
-
383
-
384
-
385
-
386
-
387
-
388
-
389
-
390
-
391
-
392
-
393
-
394
-
395
-
396
-
397
-
398
-
399
-
400
-
401
-
402
-
403
-
404
-
405
-
406
-
407
-
408
-
409
-
410
-
411
-
412
-
413
-
414
 |
 |
