HP 6125XLG R2306-HP 6125XLG Blade Switch Layer 3 - IP Routing Configuration Gu - Page 186
Configuring an EBGP peer group, Command, Remarks, Method 1
 |
View all HP 6125XLG manuals
Add to My Manuals
Save this manual to your list of manuals |
Page 186 highlights
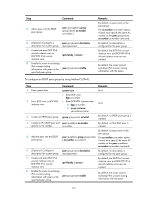
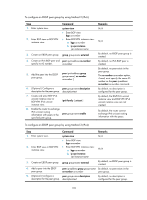
Step 2. Enter BGP view or BGP-VPN instance view. Command • Enter BGP view: bgp as-number • Enter BGP-VPN instance view: a. bgp as-number b. ip vpn-instance vpn-instance-name 3. Create an IBGP peer group. group group-name [ internal ] 4. Add a peer into the IBGP peer peer ipv6-address group group. group-name [ as-number as-number ] 5. (Optional.) Configure a peer group-name description description for a peer group. description-text 6. Create and enter BGP IPv6 unicast instance view or BGP-VPN IPv6 unicast instance view. ipv6-family [ unicast ] 7. Enable the router to exchange IPv6 unicast routing information with peers in the peer group-name enable specified peer group. Remarks N/A By default, no IBGP peer group is created. By default, no peer exists in the peer group. To use the as-number as-number option, you must specify the local AS number. By default, no description is configured for the peer group. By default, the BGP IPv6 unicast instance view and BGP-VPN IPv6 unicast instance view are not created. By default, the router cannot exchange IPv6 unicast routing information with the peers. Configuring an EBGP peer group If peers in an EBGP group belong to the same external AS, the EBGP peer group is a pure EBGP peer group. If not, it is a mixed EBGP peer group. Use one of the following methods to configure an EBGP peer group: • Method 1-Create an EBGP peer group, specify its AS number, and add peers into it. All the added peers have the same AS number. All peers in the peer group have the same AS number as the peer group. You can specify an AS number for a peer before adding it into the peer group. The AS number must be the same as that of the peer group. • Method 2-Create an EBGP peer group, specify an AS number for a peer, and add the peer into the peer group. Peers added in the group can have different AS numbers. • Method 3-Create an EBGP peer group and add a peer with an AS number into it. Peers added in the group can have different AS numbers. To configure an EBGP peer group by using Method 1 (IPv4): Step 1. Enter system view. Command system-view Remarks N/A 175
-
 1
1 -
2
-
3
-
4
-
5
-
6
-
7
-
8
-
9
-
10
-
11
-
12
-
13
-
14
-
15
-
16
-
17
-
18
-
19
-
20
-
21
-
22
-
23
-
24
-
25
-
26
-
27
-
28
-
29
-
30
-
31
-
32
-
33
-
34
-
35
-
36
-
37
-
38
-
39
-
40
-
41
-
42
-
43
-
44
-
45
-
46
-
47
-
48
-
49
-
50
-
51
-
52
-
53
-
54
-
55
-
56
-
57
-
58
-
59
-
60
-
61
-
62
-
63
-
64
-
65
-
66
-
67
-
68
-
69
-
70
-
71
-
72
-
73
-
74
-
75
-
76
-
77
-
78
-
79
-
80
-
81
-
82
-
83
-
84
-
85
-
86
-
87
-
88
-
89
-
90
-
91
-
92
-
93
-
94
-
95
-
96
-
97
-
98
-
99
-
100
-
101
-
102
-
103
-
104
-
105
-
106
-
107
-
108
-
109
-
110
-
111
-
112
-
113
-
114
-
115
-
116
-
117
-
118
-
119
-
120
-
121
-
122
-
123
-
124
-
125
-
126
-
127
-
128
-
129
-
130
-
131
-
132
-
133
-
134
-
135
-
136
-
137
-
138
-
139
-
140
-
141
-
142
-
143
-
144
-
145
-
146
-
147
-
148
-
149
-
150
-
151
-
152
-
153
-
154
-
155
-
156
-
157
-
158
-
159
-
160
-
161
-
162
-
163
-
164
-
165
-
166
-
167
-
168
-
169
-
170
-
171
-
172
-
173
-
174
-
175
-
176
-
177
-
178
-
179
-
180
-
 181
181 -
 182
182 -
 183
183 -
 184
184 -
 185
185 -
 186
186 -
 187
187 -
 188
188 -
 189
189 -
 190
190 -
 191
191 -
192
-
193
-
194
-
195
-
196
-
197
-
198
-
199
-
200
-
201
-
202
-
203
-
204
-
205
-
206
-
207
-
208
-
209
-
210
-
211
-
212
-
213
-
214
-
215
-
216
-
217
-
218
-
219
-
220
-
221
-
222
-
223
-
224
-
225
-
226
-
227
-
228
-
229
-
230
-
231
-
232
-
233
-
234
-
235
-
236
-
237
-
238
-
239
-
240
-
241
-
242
-
243
-
244
-
245
-
246
-
247
-
248
-
249
-
250
-
251
-
252
-
253
-
254
-
255
-
256
-
257
-
258
-
259
-
260
-
261
-
262
-
263
-
264
-
265
-
266
-
267
-
268
-
269
-
270
-
271
-
272
-
273
-
274
-
275
-
276
-
277
-
278
-
279
-
280
-
281
-
282
-
283
-
284
-
285
-
286
-
287
-
288
-
289
-
290
-
291
-
292
-
293
-
294
-
295
-
296
-
297
-
298
-
299
-
300
-
301
-
302
-
303
-
304
-
305
-
306
-
307
-
308
-
309
-
310
-
311
-
312
-
313
-
314
-
315
-
316
-
317
-
318
-
319
-
320
-
321
-
322
-
323
-
324
-
325
-
326
-
327
-
328
-
329
-
330
-
331
-
332
-
333
-
334
-
335
-
336
-
337
-
338
-
339
-
340
-
341
-
342
-
343
-
344
-
345
-
346
-
347
-
348
-
349
-
350
-
351
-
352
-
353
-
354
-
355
-
356
-
357
-
358
-
359
-
360
-
361
-
362
-
363
-
364
-
365
-
366
-
367
-
368
-
369
-
370
-
371
-
372
-
373
-
374
-
375
-
376
-
377
-
378
-
379
-
380
-
381
-
382
-
383
-
384
-
385
-
386
-
387
-
388
-
389
-
390
-
391
-
392
-
393
-
394
-
395
-
396
-
397
-
398
-
399
-
400
-
401
-
402
-
403
-
404
-
405
-
406
-
407
-
408
-
409
-
410
-
411
-
412
-
413
-
414
 |
 |
