HP 7410 Wired/Wireless Networking Guide - Page 19
Connect to the network, Network, Wireless Setup Wizard, Enter a New Network Name SSID - wpa
 |
UPC - 829160502724
View all HP 7410 manuals
Add to My Manuals
Save this manual to your list of manuals |
Page 19 highlights
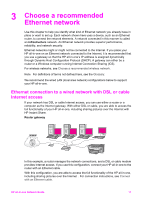
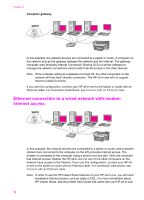
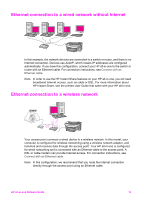
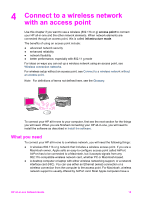
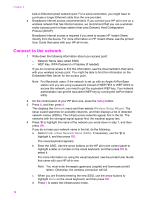
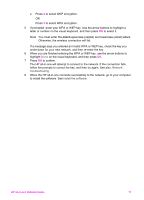
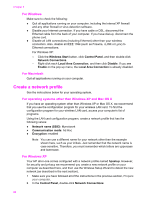
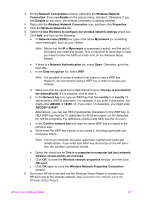
Chapter 4 built-in Ethernet (wired network) port. For a wired connection, you might have to purchase a longer Ethernet cable than the one provided. ● Broadband Internet access (recommended). If you connect your HP all-in-one on a wireless network that has Internet access, we recommend that you use a wireless router (access point or base station) that uses Dynamic Host Configuration Protocol (DHCP). Broadband Internet access is required if you want to access HP Instant Share directly from the device. For more information on HP Instant Share, see the printed User Guide that came with your HP all-in-one. Connect to the network 1 Write down the following information about your access point: - Network Name (also called SSID) - WEP Key, WPA Password or Passkey (if needed) If you do not know where to find this information, see the documentation that came with your wireless access point. You might be able to find this information on the Embedded Web Server for the access point. Note For Macintosh users: If the network is set up with an Apple AirPort Base station and you are using a password instead of WEP HEX or WEP ASCII to access this network, you need to get the equivalent WEP key. Your network administrator can get the equivalent WEP key by running the AirPort Admin utility. 2 On the control panel of your HP all-in-one, press the Setup button. 3 Press 8, and then press 4. This displays the Network menu and then selects Wireless Setup Wizard. The setup wizard searches for available networks, and then displays a list of detected network names (SSIDs). The infrastructure networks appear first in the list. The networks with the strongest signal appear first, the weakest appear last. 4 Press to highlight the name of the network you wrote down in step 1, and then press OK. If you do not see your network name in the list, do the following: a Select Enter a New Network Name (SSID). If necessary, use the to highlight it, and then press OK. The visual keyboard appears. b Enter the SSID. Use the arrow buttons on the HP all-in-one control panel to highlight a letter or number on the visual keyboard, and then press OK to select it. For more information on using the visual keyboard, see the printed User Guide that came with your HP all-in-one. Note You must enter the exact uppercase (capital) and lowercase (small) letters. Otherwise, the wireless connection will fail. c When you are finished entering the new SSID, use the arrow buttons to highlight Done on the visual keyboard, and then press OK. d Press 1 to select the infrastructure mode.. 16
-
 1
1 -
2
-
3
-
4
-
5
-
6
-
7
-
8
-
9
-
10
-
11
-
12
-
13
-
 14
14 -
 15
15 -
 16
16 -
 17
17 -
 18
18 -
 19
19 -
 20
20 -
 21
21 -
 22
22 -
 23
23 -
 24
24 -
25
-
26
-
27
-
28
-
29
-
30
-
31
-
32
-
33
-
34
-
35
-
36
-
37
-
38
-
39
-
40
-
41
-
42
-
43
-
44
-
45
-
46
-
47
-
48
-
49
-
50
-
51
-
52
-
53
-
54
-
55
-
56
-
57
-
58
-
59
-
60
-
61
-
62
 |
 |
