HP BladeSystem bc2800 Service Reference Guide: HP BladeSystem PC Blade Enclosu - Page 21
Removing the Interconnect Tray, Powering Down a Blade PC, on Powering Down the Enclosure
 |
View all HP BladeSystem bc2800 manuals
Add to My Manuals
Save this manual to your list of manuals |
Page 21 highlights
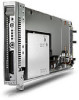
Removing the Interconnect Tray To remove the interconnect tray: 1. Power down each HP Blade PC (Powering Down a Blade PC on page 12). 2. Power down the enclosure (Powering Down the Enclosure on page 10). 3. Disconnect all cables and power cords from the AC power source. 4. Disconnect all cables and power cords from the enclosure rear panel. 5. Remove both hot-plug power supplies (Hot-Plug Power Supplies on page 8). 6. Push the locking latches toward the front of the enclosure to expose the release latches securing the interconnect tray in the enclosure (1). 7. Pull the release latches toward the rear of the enclosure (2). 8. Remove the interconnect tray from the enclosure (3). Figure 3-9 Removing the interconnect tray from the enclosure NOTE: Perform step 6 simultaneously in both power supply bays. Reverse the previous steps to replace the interconnect tray. NOTE: When installing the interconnect tray, be sure that the release latches are in the open position. When closing the release latches on the interconnect tray, be sure that the locking latches click audibly into place. Preparing for Non-Hot-Plug Procedures 15
-
 1
1 -
2
-
3
-
4
-
5
-
6
-
7
-
8
-
9
-
10
-
11
-
12
-
13
-
14
-
15
-
 16
16 -
 17
17 -
 18
18 -
 19
19 -
 20
20 -
 21
21 -
 22
22 -
 23
23 -
 24
24 -
 25
25 -
 26
26 -
27
-
28
-
29
-
30
-
31
-
32
-
33
-
34
-
35
-
36
-
37
-
38
-
39
-
40
-
41
-
42
-
43
-
44
-
45
-
46
-
47
-
48
-
49
-
50
-
51
-
52
-
53
-
54
-
55
-
56
-
57
-
58
-
59
-
60
-
61
-
62
-
63
-
64
-
65
-
66
-
67
-
68
-
69
-
70
-
71
-
72
-
73
-
74
-
75
-
76
-
77
-
78
-
79
 |
 |
