HP BladeSystem bc2800 Service Reference Guide: HP BladeSystem PC Blade Enclosu - Page 28
Removing the enclosure status assembly from the enclosure
 |
View all HP BladeSystem bc2800 manuals
Add to My Manuals
Save this manual to your list of manuals |
Page 28 highlights
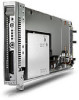
9. Place the enclosure on a level, non-conductive surface. 10. Open the access door (Opening the Access Door on page 17). 11. Disconnect the enclosure status cable from the midplane (signal board). Figure 3-15 Disconnecting the enclosure status cable from the midplane signal board 12. Remove the screws securing the enclosure status assembly in the enclosure (1). 13. Remove the enclosure status assembly from the enclosure (2). Figure 3-16 Removing the enclosure status assembly from the enclosure Reverse the previous steps to replace the enclosure status assembly. 22 Chapter 3 Removal and Replacement Procedures
-
 1
1 -
2
-
3
-
4
-
5
-
6
-
7
-
8
-
9
-
10
-
11
-
12
-
13
-
14
-
15
-
16
-
17
-
18
-
19
-
20
-
21
-
22
-
 23
23 -
 24
24 -
 25
25 -
 26
26 -
 27
27 -
 28
28 -
 29
29 -
 30
30 -
 31
31 -
 32
32 -
 33
33 -
34
-
35
-
36
-
37
-
38
-
39
-
40
-
41
-
42
-
43
-
44
-
45
-
46
-
47
-
48
-
49
-
50
-
51
-
52
-
53
-
54
-
55
-
56
-
57
-
58
-
59
-
60
-
61
-
62
-
63
-
64
-
65
-
66
-
67
-
68
-
69
-
70
-
71
-
72
-
73
-
74
-
75
-
76
-
77
-
78
-
79
 |
 |

9.
Place the enclosure on a level, non-conductive surface.
10.
Open the access door (
Opening the Access Door
on page
17
).
11.
Disconnect the enclosure status cable from the midplane (signal board).
Figure 3-15
Disconnecting the enclosure status cable from the midplane signal board
12.
Remove the screws securing the enclosure status assembly in the enclosure
(1)
.
13.
Remove the enclosure status assembly from the enclosure
(2)
.
Figure 3-16
Removing the enclosure status assembly from the enclosure
Reverse the previous steps to replace the enclosure status assembly.
22
Chapter 3
Removal and Replacement Procedures