HP Brio ba300 hp brio ba300, troubleshooting guide - Page 21
Hard Disk or CD-ROM Drive Test Error, CMOS Test Error
 |
View all HP Brio ba300 manuals
Add to My Manuals
Save this manual to your list of manuals |
Page 21 highlights
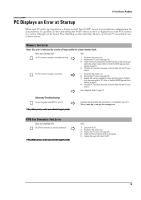
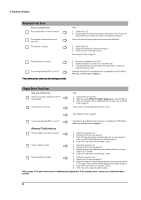
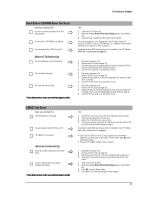
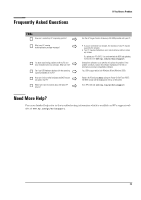
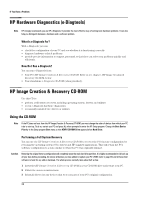
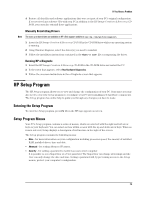
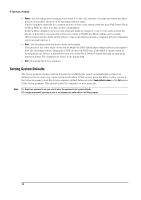
If You Have a Problem Hard Disk or CD-ROM Drive Test Error Have you checked that... The drive is correctly configured in the PC's Setup program Ö The hard disk or CD-ROM drive is working You are using the latest BIOS for your PC Advanced Troubleshooting The drive cables are correctly connected Ö Ö Ö The drive cable is working The drive itself has not failed Ö Ö If the problem persists, contact your authorized support provider How 1 Switch the PC OFF then ON. 2 When the message Press F2 to Enter Setup appears, press the F2 key. 3 Check the drive is enabled and the correct type is selected. To test your hard drive, run e-Diagtools from the HP Image Creation & Recovery CD-ROM. To test your CD-ROM drive, run e-Diagtools from the Utility Partition on your hard drive. Refer to page 24. Download the latest BIOS and instructions for its installation from HP's Web at: www.hp.com/go/briosupport 1 Disconnect the power cord. 2 Remove the PC's cover (see page 29). 3 Check the drive's power and data cables are correctly connected. Refer to the Brio BA300 Upgrade Guide (details on page 5). 4 Close the PC then switch it on and check it works. 1 Disconnect the power cord. 2 Remove the PC's cover (see page 29). 3 Replace the drive cable by a known working cable from the same model of PC, if possible. 4 Close the PC then switch it on and check it works. 1 Disconnect the power cord. 2 Remove the PC's cover (see page 29). 3 Replace the drive by a known working drive from the same model of PC, if possible. Refer to the Brio BA300 Upgrade Guide (details on page 5). 4 Close the PC then switch it on and check it works. CMOS Test Error Have you checked that... The internal battery is working Ö You are using the latest BIOS for your PC The CMOS is not corrupted Ö Ö Advanced Troubleshooting Power is correctly connected to the system board Ö You don't need to restore the default configuration settings Ö If the problem persists, contact your authorized support provider How 1 Set the PC to the correct time (refer to the operating system manual). 2 Switch off and unplug the PC for an hour. 3 Restart the PC and check the time is correct. 4 If the time is incorrect, replace the PC's battery by a new one. Refer to the Brio BA300 Upgrade Guide (details on page 5). Download the latest BIOS and instructions for its installation from HP's Web at: www.hp.com/go/briosupport • Clear your PC's CMOS in the PC's Setup program (the recommended method) if you have access to this option. To enter Setup, press F2 when prompted at startup • Clear your PC's CMOS manually. Refer to page 27. 1 Disconnect the power cord. 2 Remove the PC's cover (see page 29). 3 Check the power connector is correctly attached to the system board. 4 Close the PC, reconnect the power cord and check that the PC boots (starts). 1 Switch the PC OFF then ON. 2 When the message Press F2 to Enter Setup appears, press the F2 key. 3 Press F9 to restore default values. 4 Press F10 to exit the Setup program saving changes. 21
-
 1
1 -
2
-
3
-
4
-
5
-
6
-
7
-
8
-
9
-
10
-
11
-
12
-
13
-
14
-
15
-
 16
16 -
 17
17 -
 18
18 -
 19
19 -
 20
20 -
 21
21 -
 22
22 -
 23
23 -
 24
24 -
 25
25 -
 26
26 -
27
-
28
-
29
-
30
-
31
-
32
-
33
-
34
-
35
-
36
 |
 |
