HP CP1215 HP Color LaserJet CP1210 Series - Software Technical Reference - Page 80
Create a custom printing shortcut, Print in Black and White - color laserjet laser printer
 |
UPC - 883585140114
View all HP CP1215 manuals
Add to My Manuals
Save this manual to your list of manuals |
Page 80 highlights
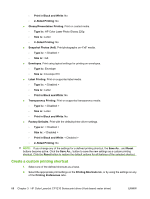
◦ Print in Black and White: No ◦ 2-Sided Printing: No ● Glossy/Presentation Printing. Print on coated media. ◦ Type is:: HP Color Laser Photo Glossy 220g ◦ Size is:: Letter ◦ 2-Sided Printing: No ● Snapshot Photos (4x6). Print photographs on 4"x6" media. ◦ Type is:: < Disabled > ◦ Size is:: 4x6 ● Envelopes. Print using typical settings for printing on envelopes. ◦ Type is:: Envelope ◦ Size is:: Envelope #10 ● Label Printing. Print on supported label media. ◦ Type is:: < Disabled > ◦ Size is:: Letter ◦ Print in Black and White: No ● Transparency Printing. Print on supported transparency media. ◦ Type is:: < Disabled > ◦ Size is:: Letter ◦ Print in Black and White: No ● Factory Defaults. Print with the default printer-driver settings. ◦ Type is:: < Disabled > ◦ Size is:: < Disabled > ◦ Print in Black and White: < Disabled > ◦ 2-Sided Printing: No NOTE: If you change any of the settings for a defined printing shortcut, the Save As... and Reset buttons become active. Click the Save As... button to save the new settings as a custom printing shortcut. Click the Reset button to restore the default options for all features of the selected shortcut. Create a custom printing shortcut 1. Select one of the defined shortcuts as a base. 2. Select the appropriate print settings on the Printing Shortcuts tab, or by using the settings on any of the Printing Preferences tabs. 68 Chapter 3 HP Color LaserJet CP1210 Series print driver (Host-based raster driver) ENWW
-
 1
1 -
2
-
3
-
4
-
5
-
6
-
7
-
8
-
9
-
10
-
11
-
12
-
13
-
14
-
15
-
16
-
17
-
18
-
19
-
20
-
21
-
22
-
23
-
24
-
25
-
26
-
27
-
28
-
29
-
30
-
31
-
32
-
33
-
34
-
35
-
36
-
37
-
38
-
39
-
40
-
41
-
42
-
43
-
44
-
45
-
46
-
47
-
48
-
49
-
50
-
51
-
52
-
53
-
54
-
55
-
56
-
57
-
58
-
59
-
60
-
61
-
62
-
63
-
64
-
65
-
66
-
67
-
68
-
69
-
70
-
71
-
72
-
73
-
74
-
 75
75 -
 76
76 -
 77
77 -
 78
78 -
 79
79 -
 80
80 -
 81
81 -
 82
82 -
 83
83 -
 84
84 -
 85
85 -
86
-
87
-
88
-
89
-
90
-
91
-
92
-
93
-
94
-
95
-
96
-
97
-
98
-
99
-
100
-
101
-
102
-
103
-
104
-
105
-
106
-
107
-
108
-
109
-
110
-
111
-
112
-
113
-
114
-
115
-
116
-
117
-
118
-
119
-
120
-
121
-
122
-
123
-
124
-
125
-
126
-
127
-
128
 |
 |
