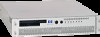
HP Carrier-grade cc3300 UserÆs Guide and Technical UserÆs Gu - Page 70
Replacing the Hard Disk Drives
 |
View all HP Carrier-grade cc3300 manuals
Add to My Manuals
Save this manual to your list of manuals |
Page 70 highlights
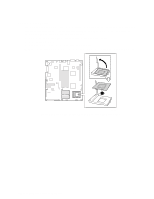
Replacing the Hard Disk Drives To replace a hard disk drive, follow this procedure: 1. Remove the bezel and top cover. 2. Unplug the signal cables (A in Figure 16) and power cables (B in Figure 16) from one or both hard disk drives. 3. Remove the securing screws (C in Figure 16) from the hard disk drive carriers and slide in the directions indicated (D in Figure 16) to release from the keyhole standoffs. 4. Lift out the hard disk drives (E in Figure 16) and place on a clean, static-free work surface. Figure 16. Removing a Hard Disk Drive Disassembling the Hard Disk Drive Carrier 1. Turn the hard disk drive carrier so that component side of the drive is face up. 2. In this position, the bottom edge of the sheet metal is aligned with the top of the drive and allows for easy removal and replacement of four retaining screws. Setting Hard Drive SCSI Addresses The hard disk drive's SCSI address needs to be set on any replacement or any additional disk drives being installed in the server. Improper SCSI address settings can result in a boot failure if the SCSI addresses are identical. Disk SCSI addresses are set to 5 and/or 6 at the factory. 70 cc2300 Carrier Grade Server Product Guide
-
 1
1 -
2
-
3
-
4
-
5
-
6
-
7
-
8
-
9
-
10
-
11
-
12
-
13
-
14
-
15
-
16
-
17
-
18
-
19
-
20
-
21
-
22
-
23
-
24
-
25
-
26
-
27
-
28
-
29
-
30
-
31
-
32
-
33
-
34
-
35
-
36
-
37
-
38
-
39
-
40
-
41
-
42
-
43
-
44
-
45
-
46
-
47
-
48
-
49
-
50
-
51
-
52
-
53
-
54
-
55
-
56
-
57
-
58
-
59
-
60
-
61
-
62
-
63
-
64
-
 65
65 -
 66
66 -
 67
67 -
 68
68 -
 69
69 -
 70
70 -
 71
71 -
 72
72 -
 73
73 -
 74
74 -
 75
75 -
76
-
77
-
78
-
79
-
80
-
81
-
82
-
83
-
84
-
85
-
86
-
87
-
88
-
89
-
90
-
91
-
92
-
93
-
94
-
95
-
96
-
97
-
98
-
99
-
100
-
101
-
102
-
103
-
104
-
105
-
106
-
107
-
108
-
109
-
110
-
111
-
112
-
113
-
114
-
115
-
116
-
117
-
118
-
119
-
120
-
121
-
122
-
123
-
124
-
125
-
126
-
127
-
128
-
129
-
130
-
131
-
132
-
133
-
134
-
135
 |
 |
