HP Color Inkjet cp1160 HP Color Inkjet Printer CP1160 - (English) User Guide - Page 58
To change a watermark, select the watermark., Create or change the watermark message, message angle
 |
View all HP Color Inkjet cp1160 manuals
Add to My Manuals
Save this manual to your list of manuals |
Page 58 highlights
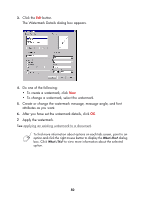
3. Click the Edit button. The Watermark Details dialog box appears. 4. Do one of the following: • To create a watermark, click New. • To change a watermark, select the watermark. 5. Create or change the watermark message, message angle, and font attributes as you want. 6. After you have set the watermark details, click OK. 7. Apply the watermark. See applying an existing watermark to a document. To find more information about options on each tab screen, point to an option and click the right mouse button to display the What's This? dialog box. Click What's This? to view more information about the selected option. 50
-
 1
1 -
2
-
3
-
4
-
5
-
6
-
7
-
8
-
9
-
10
-
11
-
12
-
13
-
14
-
15
-
16
-
17
-
18
-
19
-
20
-
21
-
22
-
23
-
24
-
25
-
26
-
27
-
28
-
29
-
30
-
31
-
32
-
33
-
34
-
35
-
36
-
37
-
38
-
39
-
40
-
41
-
42
-
43
-
44
-
45
-
46
-
47
-
48
-
49
-
50
-
51
-
52
-
 53
53 -
 54
54 -
 55
55 -
 56
56 -
 57
57 -
 58
58 -
 59
59 -
 60
60 -
 61
61 -
 62
62 -
 63
63 -
64
-
65
-
66
-
67
-
68
-
69
-
70
-
71
-
72
-
73
-
74
-
75
-
76
-
77
-
78
-
79
-
80
-
81
-
82
-
83
-
84
-
85
-
86
-
87
-
88
-
89
-
90
-
91
-
92
-
93
-
94
-
95
-
96
-
97
-
98
-
99
-
100
-
101
-
102
-
103
-
104
-
105
-
106
-
107
-
108
-
109
-
110
-
111
-
112
-
113
-
114
-
115
-
116
-
117
-
118
-
119
-
120
-
121
-
122
-
123
-
124
-
125
-
126
-
127
-
128
-
129
-
130
-
131
-
132
-
133
-
134
-
135
-
136
-
137
-
138
-
139
-
140
-
141
-
142
-
143
-
144
-
145
-
146
-
147
-
148
-
149
-
150
-
151
-
152
-
153
-
154
-
155
-
156
-
157
-
158
-
159
-
160
-
161
-
162
-
163
-
164
-
165
-
166
-
167
-
168
-
169
-
170
-
171
-
172
-
173
-
174
-
175
-
176
-
177
-
178
-
179
-
180
-
181
-
182
-
183
-
184
-
185
-
186
-
187
-
188
-
189
-
190
-
191
-
192
-
193
-
194
-
195
-
196
-
197
-
198
-
199
-
200
-
201
-
202
-
203
-
204
-
205
-
206
-
207
-
208
-
209
-
210
-
211
-
212
-
213
 |
 |

50
3.
Click the
Edit
button.
The Watermark Details dialog box appears.
4.
Do one of the following:
•
To create a watermark, click
New
.
•
To change a watermark, select the watermark.
5.
Create or change the watermark message, message angle, and font
attributes as you want.
6.
After you have set the watermark details, click
OK
.
7.
Apply the watermark.
See
applying an existing watermark to a document
.
To find more information about options on each tab screen, point to an
option and click the right mouse button to display the
What’s This?
dialog
box. Click
What’s This?
to view more information about the selected
option.