HP Designjet T790 HP Designjet T790 and T1300 ePrinter: User's Guide - English - Page 64
Custom paper sizes, Paper/Quality, Custom, Printers and Faxes, Server Properties, Forms
 |
View all HP Designjet T790 manuals
Add to My Manuals
Save this manual to your list of manuals |
Page 64 highlights
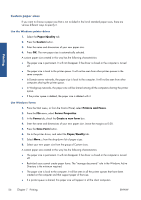
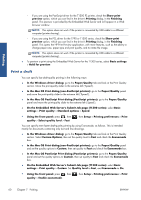
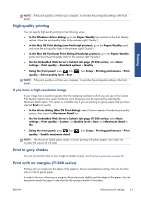
Printing Custom paper sizes If you want to choose a paper size that is not included in the list of standard paper sizes, there are various different ways to specify it. Use the Windows printer driver 1. Select the Paper/Quality tab. 2. Press the Custom button. 3. Enter the name and dimensions of your new paper size. 4. Press OK. The new paper size is automatically selected. A custom paper size created in this way has the following characteristics: ● The paper size is permanent. It will not disappear if the driver is closed or the computer is turned off. ● The paper size is local to the printer queue. It will not be seen from other printer queues in the same computer. ● In Domain server networks, the paper size is local to the computer. It will not be seen from other computers sharing the printer queue. ● In Workgroup networks, the paper size will be shared among all the computers sharing the printer queue. ● If the printer queue is deleted, the paper size is deleted with it. Use Windows forms 1. From the Start menu, or from the Control Panel, select Printers and Faxes. 2. From the File menu, select Server Properties. 3. In the Forms tab, check the Create a new form box. 4. Enter the name and dimensions of your new paper size. Leave the margins as 0.00. 5. Press the Save Form button. 6. Go to the printer driver, and select the Paper/Quality tab. 7. Select More... from the drop-down list of paper sizes. 8. Select your new paper size from the group of Custom sizes. A custom paper size created in this way has the following characteristics: ● The paper size is permanent. It will not disappear if the driver is closed or the computer is turned off. ● Restricted users cannot create paper forms. The "manage documents" role in the Windows Active Directory is the minimum required. ● The paper size is local to the computer. It will be seen in all the printer queues that have been created on the computer and that support paper of that size. ● If a printer queue is shared, this paper size will appear in all the client computers. 56 Chapter 7 Printing ENWW
-
 1
1 -
2
-
3
-
4
-
5
-
6
-
7
-
8
-
9
-
10
-
11
-
12
-
13
-
14
-
15
-
16
-
17
-
18
-
19
-
20
-
21
-
22
-
23
-
24
-
25
-
26
-
27
-
28
-
29
-
30
-
31
-
32
-
33
-
34
-
35
-
36
-
37
-
38
-
39
-
40
-
41
-
42
-
43
-
44
-
45
-
46
-
47
-
48
-
49
-
50
-
51
-
52
-
53
-
54
-
55
-
56
-
57
-
58
-
 59
59 -
 60
60 -
 61
61 -
 62
62 -
 63
63 -
 64
64 -
 65
65 -
 66
66 -
 67
67 -
 68
68 -
 69
69 -
70
-
71
-
72
-
73
-
74
-
75
-
76
-
77
-
78
-
79
-
80
-
81
-
82
-
83
-
84
-
85
-
86
-
87
-
88
-
89
-
90
-
91
-
92
-
93
-
94
-
95
-
96
-
97
-
98
-
99
-
100
-
101
-
102
-
103
-
104
-
105
-
106
-
107
-
108
-
109
-
110
-
111
-
112
-
113
-
114
-
115
-
116
-
117
-
118
-
119
-
120
-
121
-
122
-
123
-
124
-
125
-
126
-
127
-
128
-
129
-
130
-
131
-
132
-
133
-
134
-
135
-
136
-
137
-
138
-
139
-
140
-
141
-
142
-
143
-
144
-
145
-
146
-
147
-
148
-
149
-
150
-
151
-
152
-
153
-
154
-
155
-
156
-
157
-
158
-
159
-
160
-
161
-
162
-
163
-
164
-
165
-
166
-
167
-
168
-
169
-
170
-
171
-
172
-
173
-
174
-
175
-
176
-
177
-
178
-
179
-
180
-
181
-
182
-
183
-
184
-
185
-
186
-
187
-
188
-
189
-
190
-
191
-
192
-
193
-
194
-
195
-
196
-
197
-
198
-
199
-
200
-
201
-
202
-
203
-
204
-
205
-
206
-
207
-
208
-
209
-
210
-
211
-
212
-
213
 |
 |
