HP Deskjet D2600 User Guide - Page 39
Print quality troubleshooting, icon appears - installation
 |
View all HP Deskjet D2600 manuals
Add to My Manuals
Save this manual to your list of manuals |
Page 39 highlights
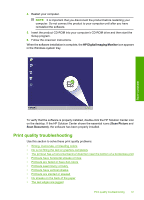
4. Restart your computer. NOTE: It is important that you disconnect the product before restarting your computer. Do not connect the product to your computer until after you have reinstalled the software. 5. Insert the product CD-ROM into your computer's CD-ROM drive and then start the Setup program. 6. Follow the onscreen instructions. When the software installation is complete, the HP Digital Imaging Monitor icon appears in the Windows system tray. Solve a problem To verify that the software is properly installed, double-click the HP Solution Center icon on the desktop. If the HP Solution Center shows the essential icons (Scan Picture and Scan Document), the software has been properly installed. Print quality troubleshooting Use this section to solve these print quality problems: • Wrong, inaccurate, or bleeding colors • Ink is not filling the text or graphics completely • The printout has a horizontal band of distortion near the bottom of a borderless print • Printouts have horizontal streaks or lines • Printouts are faded or have dull colors • Printouts seem blurry or fuzzy • Printouts have vertical streaks • Printouts are slanted or skewed • Ink streaks on the back of the paper • The text edges are jagged Print quality troubleshooting 37
-
 1
1 -
2
-
3
-
4
-
5
-
6
-
7
-
8
-
9
-
10
-
11
-
12
-
13
-
14
-
15
-
16
-
17
-
18
-
19
-
20
-
21
-
22
-
23
-
24
-
25
-
26
-
27
-
28
-
29
-
30
-
31
-
32
-
33
-
 34
34 -
 35
35 -
 36
36 -
 37
37 -
 38
38 -
 39
39 -
 40
40 -
 41
41 -
 42
42 -
 43
43 -
 44
44 -
45
-
46
-
47
-
48
-
49
-
50
-
51
-
52
-
53
-
54
-
55
-
56
-
57
-
58
-
59
-
60
-
61
-
62
-
63
-
64
-
65
-
66
-
67
-
68
-
69
-
70
-
71
-
72
-
73
-
74
-
75
-
76
-
77
-
78
-
79
-
80
-
81
-
82
-
83
-
84
-
85
-
86
-
87
-
88
 |
 |
