HP Deskjet D2600 User Guide - Page 54
Print Settings
 |
View all HP Deskjet D2600 manuals
Add to My Manuals
Save this manual to your list of manuals |
Page 54 highlights
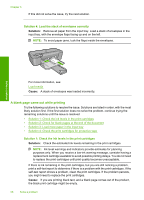
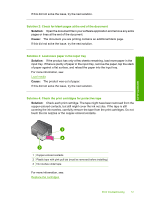
Chapter 5 Solution 1: Use TrueType or OpenType fonts Solution: Use TrueType or OpenType fonts to ensure that the product is able to print smooth fonts. When selecting a font, look for the TrueType or OpenType icon. Solve a problem TrueType icon OpenType icon Cause: The font was a custom size. Some software applications offer custom fonts that have jagged edges when enlarged or printed. Also, if you want to print bitmapped text, it might have jagged edges when enlarged or printed. If this did not solve the issue, try the next solution. Solution 2: Align the printer Solution: Align the printer. Aligning the printer can help ensure excellent print quality. To align the printer from the HP Photosmart Software 1. Load letter, A4, or legal unused plain white paper into the input tray. 2. In the HP Solution Center, click Settings. 3. In the Print Settings area, click Printer Toolbox. NOTE: You can also open the Printer Toolbox from the Print Properties dialog box. In the Print Properties dialog box, click the Features tab, and then click Printer Services. The Printer Toolbox appears. 4. Click the Device Services tab. 5. Click Align the Printer. The product prints a test page, aligns the print head, and calibrates the printer. Recycle or discard the page. Cause: The printer needed to be aligned. If this did not solve the issue, try the next solution. Solution 3: Clean the print cartridge nozzles Solution: Check the print cartridges. If it looks as though there are fibers or dust around the ink nozzles, clean the ink nozzle area of the print cartridge. Cause: The print cartridge nozzles needed to be cleaned. 52 Solve a problem
-
 1
1 -
2
-
3
-
4
-
5
-
6
-
7
-
8
-
9
-
10
-
11
-
12
-
13
-
14
-
15
-
16
-
17
-
18
-
19
-
20
-
21
-
22
-
23
-
24
-
25
-
26
-
27
-
28
-
29
-
30
-
31
-
32
-
33
-
34
-
35
-
36
-
37
-
38
-
39
-
40
-
41
-
42
-
43
-
44
-
45
-
46
-
47
-
48
-
 49
49 -
 50
50 -
 51
51 -
 52
52 -
 53
53 -
 54
54 -
 55
55 -
 56
56 -
 57
57 -
 58
58 -
 59
59 -
60
-
61
-
62
-
63
-
64
-
65
-
66
-
67
-
68
-
69
-
70
-
71
-
72
-
73
-
74
-
75
-
76
-
77
-
78
-
79
-
80
-
81
-
82
-
83
-
84
-
85
-
86
-
87
-
88
 |
 |