HP ENVY 15-bp100 Maintenance and Service Guide - Page 62
or similar thin, plastic tool between the top edge of the display panel, Insert a case utility tool
 |
View all HP ENVY 15-bp100 manuals
Add to My Manuals
Save this manual to your list of manuals |
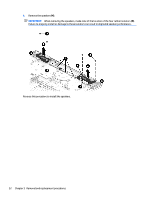
Page 62 highlights
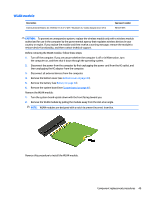
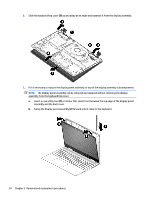
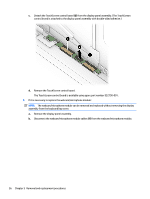
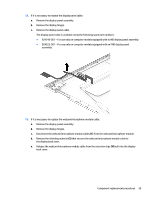
6. Slide the keyboard/top cover (5) up and away at an angle and separate it from the display assembly. 7. If it is necessary to replace the display panel assembly or any of the display assembly subcomponents: NOTE: The display panel assembly can be removed and replaced without removing the display assembly from the keyboard/top cover. a. Insert a case utility tool (1) or similar thin, plastic tool between the top edge of the display panel assembly and the back cover. b. Swing the display panel assembly (2) forward until it rests on the keyboard. 54 Chapter 5 Removal and replacement procedures
-
 1
1 -
2
-
3
-
4
-
5
-
6
-
7
-
8
-
9
-
10
-
11
-
12
-
13
-
14
-
15
-
16
-
17
-
18
-
19
-
20
-
21
-
22
-
23
-
24
-
25
-
26
-
27
-
28
-
29
-
30
-
31
-
32
-
33
-
34
-
35
-
36
-
37
-
38
-
39
-
40
-
41
-
42
-
43
-
44
-
45
-
46
-
47
-
48
-
49
-
50
-
51
-
52
-
53
-
54
-
55
-
56
-
 57
57 -
 58
58 -
 59
59 -
 60
60 -
 61
61 -
 62
62 -
 63
63 -
 64
64 -
 65
65 -
 66
66 -
 67
67 -
68
-
69
-
70
-
71
-
72
-
73
-
74
-
75
-
76
-
77
-
78
-
79
-
80
-
81
-
82
-
83
-
84
-
85
-
86
-
87
-
88
-
89
-
90
 |
 |
6.
Slide the keyboard/top cover
(5)
up and away at an angle and separate it from the display assembly.
7.
If it is necessary to replace the display panel assembly or any of the display assembly subcomponents:
NOTE:
The display panel assembly can be removed and replaced without removing the display
assembly from the keyboard/top cover.
a.
Insert a case utility tool
(1)
or similar thin, plastic tool between the top edge of the display panel
assembly and the back cover.
b.
Swing the display panel assembly
(2)
forward until it rests on the keyboard.
54
Chapter 5
Removal and replacement procedures