HP EliteBook Folio 1000 HP EliteBook Folio 1040 G1 Notebook PC Maintenance and - Page 110
Non-volatile memory usage, Un-con AMT on next boot, Save Changes and Exit, Hard Disk Drive HDD
 |
View all HP EliteBook Folio 1000 manuals
Add to My Manuals
Save this manual to your list of manuals |
Page 110 highlights
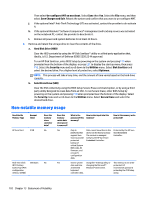
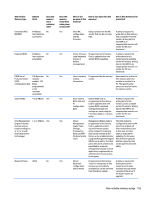
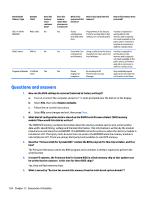
Then select Un-configure AMT on next boot. Select Save then Yes. Select the File menu, and then select Save Changes and Exit. Reboot the system and confirm that you want to un-configure AMT. j. If the optional Intel® Anti-Theft Technology (AT) was activated, contact the provider to de-activate it. k. If the optional Absolute® Software Computrace® management and tracking service was activated on the notebook PC, contact the provider to deactivate it. l. Remove all power and system batteries for at least 24 hours. 2. Remove and retain the storage drive or clear the contents of the drive. a. Hard Disk Drive (HDD) Clear the HDD contents by using the HP Disk Sanitizer® utility or a third party application that, ideally, is U.S. Department of Defense (DOD) 5220.22-M approved. To run HP Disk Sanitizer, enter BIOS Setup by powering on the system and pressing F10 when prompted near the bottom of the display, or press ESC to display the start up menu, then press F10. Select the Security menu and scroll down to the Utilities menu. Select Disk Sanitizer and select the desired drive. For a higher level of protection, select Optimum. NOTE: This process will take a long time, and the amount of time varies based on the hard drive capacity. b. Solid State Drive (SSD) Clear the SSD contents by using the BIOS Setup Secure Erase command option, or by using a third party utility designed to erase data from an SSD. To run Secure Erase, enter BIOS Setup by powering on the system and pressing F10 when prompted near the bottom of the display. Select the Security menu and scroll down to the Utilities menu. Select Secure Erase and select the desired hard drive. Non-volatile memory usage Non Volatile Memory Type Amount (Size) HP Sure Start 2 MB Real Time Clock (RTC) battery backed-up CMOS configuration memory (CMOS) 256 Bytes Does this memory store customer data? No No Does this memory retain data when power is removed? Yes Yes What is the purpose of this memory? How is data input into this memory? How is this memory write protected? Only in platforms that support Sure Start to provide protected backup of critical System BIOS code, EC firmware, and critical PC configuration data. Data cannot be written to this device via the host processor. The content is managed solely by the HP Sure Start Embedded Controller. Protected by the HP Sure Start Embedded Controller. Stores system date and time and limited keyboard controller data. Using the F10 Setup utility or changing the Microsoft® Windows® date & time. This memory is not writeprotected. HP recommends password protecting the F10 Setup utility. 102 Chapter 13 Statement of Volatility
-
 1
1 -
2
-
3
-
4
-
5
-
6
-
7
-
8
-
9
-
10
-
11
-
12
-
13
-
14
-
15
-
16
-
17
-
18
-
19
-
20
-
21
-
22
-
23
-
24
-
25
-
26
-
27
-
28
-
29
-
30
-
31
-
32
-
33
-
34
-
35
-
36
-
37
-
38
-
39
-
40
-
41
-
42
-
43
-
44
-
45
-
46
-
47
-
48
-
49
-
50
-
51
-
52
-
53
-
54
-
55
-
56
-
57
-
58
-
59
-
60
-
61
-
62
-
63
-
64
-
65
-
66
-
67
-
68
-
69
-
70
-
71
-
72
-
73
-
74
-
75
-
76
-
77
-
78
-
79
-
80
-
81
-
82
-
83
-
84
-
85
-
86
-
87
-
88
-
89
-
90
-
91
-
92
-
93
-
94
-
95
-
96
-
97
-
98
-
99
-
100
-
101
-
102
-
103
-
104
-
 105
105 -
 106
106 -
 107
107 -
 108
108 -
 109
109 -
 110
110 -
 111
111 -
 112
112 -
 113
113 -
 114
114 -
 115
115 -
116
-
117
-
118
-
119
-
120
-
121
-
122
-
123
-
124
 |
 |
