HP EliteBook Folio 1000 HP EliteBook Folio 1040 G1 Notebook PC Maintenance and - Page 44
To prevent rocking, be sure to use the correct sequence when installing the screws.
 |
View all HP EliteBook Folio 1000 manuals
Add to My Manuals
Save this manual to your list of manuals |
Page 44 highlights
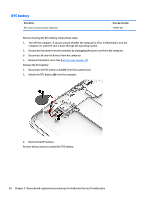
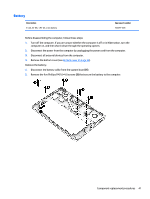
2. Pry up on the top (near the display hinge) of the bottom cover to disengage it from the computer. Reverse the removal procedures to install the bottom cover. When reinstalling the bottom cover, install the screws in the sequence as illustrated in the following image. IMPORTANT: To prevent rocking, be sure to use the correct sequence when installing the screws. 36 Chapter 5 Removal and replacement procedures for Authorized Service Provider parts
-
 1
1 -
2
-
3
-
4
-
5
-
6
-
7
-
8
-
9
-
10
-
11
-
12
-
13
-
14
-
15
-
16
-
17
-
18
-
19
-
20
-
21
-
22
-
23
-
24
-
25
-
26
-
27
-
28
-
29
-
30
-
31
-
32
-
33
-
34
-
35
-
36
-
37
-
38
-
 39
39 -
 40
40 -
 41
41 -
 42
42 -
 43
43 -
 44
44 -
 45
45 -
 46
46 -
 47
47 -
 48
48 -
 49
49 -
50
-
51
-
52
-
53
-
54
-
55
-
56
-
57
-
58
-
59
-
60
-
61
-
62
-
63
-
64
-
65
-
66
-
67
-
68
-
69
-
70
-
71
-
72
-
73
-
74
-
75
-
76
-
77
-
78
-
79
-
80
-
81
-
82
-
83
-
84
-
85
-
86
-
87
-
88
-
89
-
90
-
91
-
92
-
93
-
94
-
95
-
96
-
97
-
98
-
99
-
100
-
101
-
102
-
103
-
104
-
105
-
106
-
107
-
108
-
109
-
110
-
111
-
112
-
113
-
114
-
115
-
116
-
117
-
118
-
119
-
120
-
121
-
122
-
123
-
124
 |
 |

2.
Pry up on the top (near the display hinge) of the bottom cover to disengage it from the computer.
Reverse the removal procedures to install the bottom cover.
When reinstalling the bottom cover, install the screws in the sequence as illustrated in the following image.
IMPORTANT:
To prevent rocking, be sure to use the correct sequence when installing the screws.
36
Chapter 5
Removal and replacement procedures for Authorized Service Provider parts