HP EliteBook Folio 1000 HP EliteBook Folio 1040 G1 Notebook PC Maintenance and - Page 39
Display assembly components (panel, bezel, webcam, microphone), Remove the display assembly components
 |
View all HP EliteBook Folio 1000 manuals
Add to My Manuals
Save this manual to your list of manuals |
Page 39 highlights
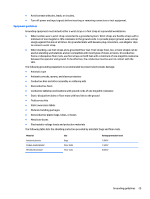
Display assembly components (panel, bezel, webcam, microphone) All display assemblies include WLAN antenna transceivers and cables. WWAN models also include 2 WWAN antenna transceivers and cables. Full hinge-up displays are not spared. This section describes removing components that do not require that you entirely remove the display assembly from the computer. You can remove the display bezel, webcam/microphone module, and display panel with the display assembly still attached to the computer. To remove the remaining display components, including the display brackets, antennas, and enclosure, you must remove the entire display assembly from the computer. See Display assembly on page 37 for more information about removing the remaining components. Description Display panels (35.6-cm [14.0-in], anti-glare, LED) SVA HD+ UVWA Display bezels For use with models with a webcam For use with models without a webcam Webcam module with microphone Microphone module Spare part number 739581-001 739582-001 739568-001 748015-001 739570-001 739571-001 Before removing the display panel, follow these steps: 1. Shut down the computer. If you are unsure whether the computer is off or in Hibernation, turn the computer on, and then shut it down through the operating system. 2. Disconnect all external devices connected to the computer. 3. Disconnect the power from the computer by first unplugging the power cord from the AC outlet, and then unplugging the AC adapter from the computer. 4. Remove the battery (see Battery on page 41). Remove the display assembly components: 1. Position the computer upright, with the front toward you. 2. Open the computer as far as possible. 3. If it is necessary to replace the display bezel: a. Close the computer, position it so you can access the bottom of the display, and then open the computer slightly. Component replacement procedures 31
-
 1
1 -
2
-
3
-
4
-
5
-
6
-
7
-
8
-
9
-
10
-
11
-
12
-
13
-
14
-
15
-
16
-
17
-
18
-
19
-
20
-
21
-
22
-
23
-
24
-
25
-
26
-
27
-
28
-
29
-
30
-
31
-
32
-
33
-
 34
34 -
 35
35 -
 36
36 -
 37
37 -
 38
38 -
 39
39 -
 40
40 -
 41
41 -
 42
42 -
 43
43 -
 44
44 -
45
-
46
-
47
-
48
-
49
-
50
-
51
-
52
-
53
-
54
-
55
-
56
-
57
-
58
-
59
-
60
-
61
-
62
-
63
-
64
-
65
-
66
-
67
-
68
-
69
-
70
-
71
-
72
-
73
-
74
-
75
-
76
-
77
-
78
-
79
-
80
-
81
-
82
-
83
-
84
-
85
-
86
-
87
-
88
-
89
-
90
-
91
-
92
-
93
-
94
-
95
-
96
-
97
-
98
-
99
-
100
-
101
-
102
-
103
-
104
-
105
-
106
-
107
-
108
-
109
-
110
-
111
-
112
-
113
-
114
-
115
-
116
-
117
-
118
-
119
-
120
-
121
-
122
-
123
-
124
 |
 |
