HP J9146A Installation Guide - Page 34
(Optional) Install a Module, Caution
 |
UPC - 884420766971
View all HP J9146A manuals
Add to My Manuals
Save this manual to your list of manuals |
Page 34 highlights
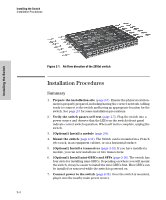
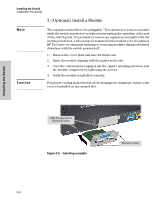
Installing the Switch Installing the Switch Installation Procedures 3. (Optional) Install a Module Note Caution The expansion al module is "hot pluggable." You can insert or remove a module while the switch is powered on without interrupting the operation of the rest of the switch ports. If you install or remove an expansion al module with the switch powered on, a reboot may be required for the module to be recognized. HP ProCurve recommends inserting or removing modules during scheduled downtime with the switch powered off. 1. Remove the cover plate and save for future use. 2. Insert the module aligning with the guides in the slot. 3. Once the contacts have engaged, use the captive retaining screws to seat the module completely by tightening the screws. 4. Verify the module is installed correctly. For proper cooling and reduction of electromagnetic emissions, ensure a slot cover is installed on any unused slot. Align the edges of the board with guides Figure 2-5. Installing a module Retaining screws 2-8
-
 1
1 -
2
-
3
-
4
-
5
-
6
-
7
-
8
-
9
-
10
-
11
-
12
-
13
-
14
-
15
-
16
-
17
-
18
-
19
-
20
-
21
-
22
-
23
-
24
-
25
-
26
-
27
-
28
-
 29
29 -
 30
30 -
 31
31 -
 32
32 -
 33
33 -
 34
34 -
 35
35 -
 36
36 -
 37
37 -
 38
38 -
 39
39 -
40
-
41
-
42
-
43
-
44
-
45
-
46
-
47
-
48
-
49
-
50
-
51
-
52
-
53
-
54
-
55
-
56
-
57
-
58
-
59
-
60
-
61
-
62
-
63
-
64
-
65
-
66
-
67
-
68
-
69
-
70
-
71
-
72
-
73
-
74
-
75
-
76
-
77
-
78
-
79
-
80
-
81
-
82
-
83
-
84
-
85
-
86
-
87
-
88
-
89
-
90
-
91
-
92
-
93
-
94
-
95
-
96
-
97
-
98
-
99
-
100
-
101
-
102
-
103
-
104
-
105
-
106
-
107
-
108
-
109
-
110
-
111
-
112
-
113
-
114
-
115
-
116
 |
 |
