HP LH4r HP Netserver LC 3 NetRAID Installation Guide - Page 58
Assign SCSI IDs
 |
View all HP LH4r manuals
Add to My Manuals
Save this manual to your list of manuals |
Page 58 highlights
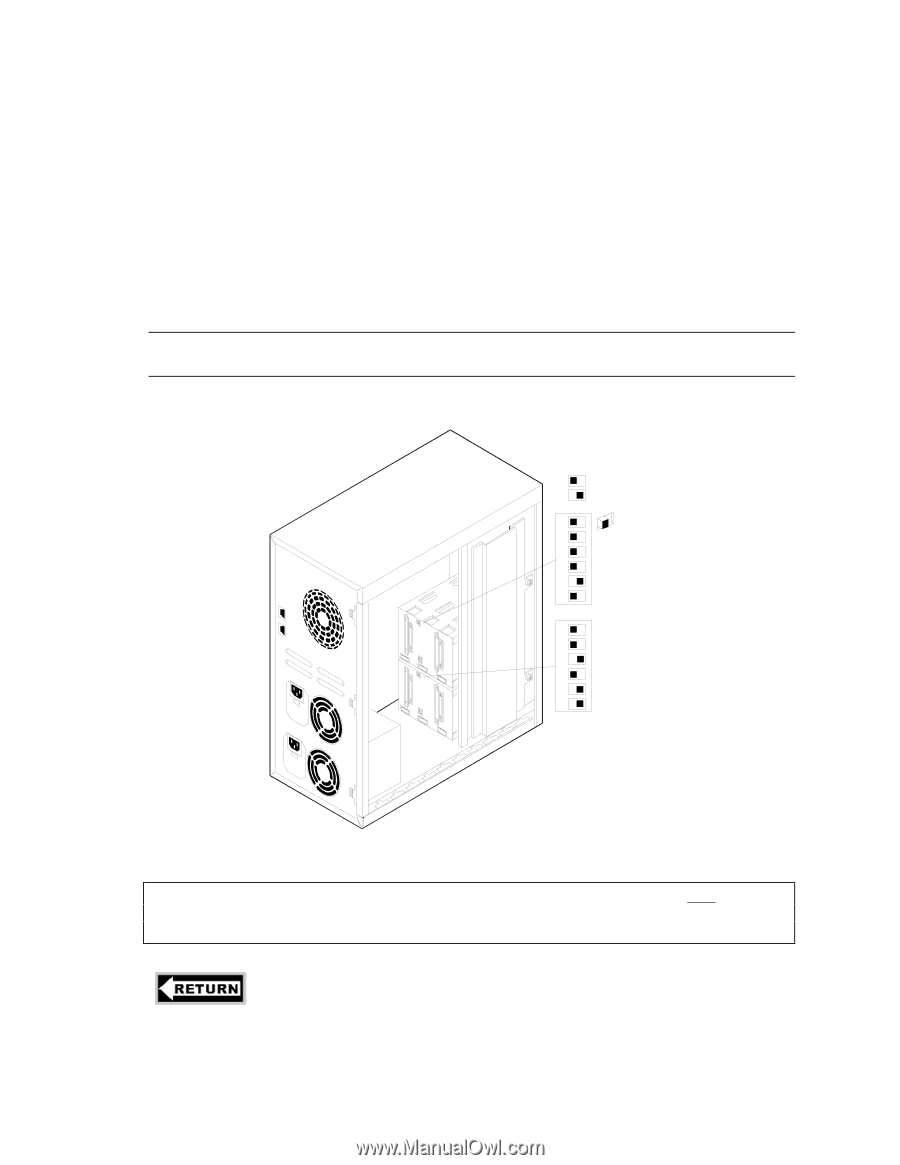
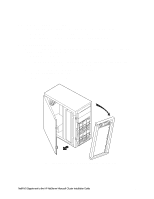
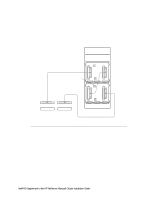
Assign SCSI IDs To configure the shared disks, change the SCSI ID assignments for each of the HP Storage System/6 units in the cluster: 1. Check, and if necessary reassign, SCSI IDs for both the upper and lower cages. Configure the upper and lower cage DIP switches as indicated below. Note that the upper cage settings are shown in their default positions. 2. Reattach and close the HP Storage System/6 side cover. Replace the front bezel. Leave the power off. 3. Repeat steps 1 and 2 for each HP Storage System/6 to be included in the cluster. NOTE The HP Storage System/6 must be operated with the side cover closed to ensure proper airflow and to prevent radio frequency interference. Off On 1 2 3 4 UPPER CAGE 5 6 1 2 3 LOWER 4 CAGE 5 6 WARNING HP Storage System/6 DIP Switch and Cluster Assignments Do not cable the shared storage units to System A or B at this time. You must configure the HP NetRAID Adapter and install Microsoft Windows NT Server, Enterprise Edition before attaching the shared storage unit. to part "4 Cluster Setup and Cabling" of the Installation Guide NetRAID Supplement to the HP NetServer Microsoft Cluster Installation Guide 11
-
 1
1 -
2
-
3
-
4
-
5
-
6
-
7
-
8
-
9
-
10
-
11
-
12
-
13
-
14
-
15
-
16
-
17
-
18
-
19
-
20
-
21
-
22
-
23
-
24
-
25
-
26
-
27
-
28
-
29
-
30
-
31
-
32
-
33
-
34
-
35
-
36
-
37
-
38
-
39
-
40
-
41
-
42
-
43
-
44
-
45
-
46
-
47
-
48
-
49
-
50
-
51
-
52
-
 53
53 -
 54
54 -
 55
55 -
 56
56 -
 57
57 -
 58
58 -
 59
59 -
 60
60 -
 61
61 -
 62
62 -
 63
63 -
64
-
65
-
66
-
67
-
68
-
69
-
70
-
71
-
72
-
73
-
74
 |
 |