HP LaserJet M700 User Guide - Page 80
Replace the imaging drums, Imaging drum information
 |
View all HP LaserJet M700 manuals
Add to My Manuals
Save this manual to your list of manuals |
Page 80 highlights
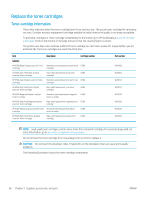
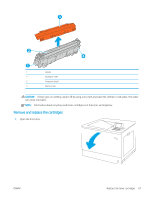
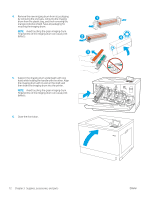
Replace the imaging drums Imaging drum information This printer indicates when an imaging drum level is low and very low. The actual imaging drum life remaining can vary. Consider having a replacement imaging drum available to install when print quality is no longer acceptable. To purchase imaging drums or check imaging drum compatibility for the printer, go to HP SureSupply at www.hp.com/go/suresupply. Scroll to the bottom of the page and verify that the country/region is correct. The printer uses four imaging drums installed next to each toner cartridge. One universal imaging drum part fits in all four positions. The imaging drums are inside the front door. Item HP Imaging Drum Description Replacement imaging drum Cartridge number 660A Part number W2004A Do not remove the imaging drum from its package until it is time to replace it. CAUTION: To prevent damage to the imaging drum, do not expose it to light for more than a few minutes. Cover the green imaging drum if it must be removed from the printer for an extended period of time. Do not touch the imaging drum. Fingerprints on the imaging drum can cause print-quality problems. The following illustration shows the imaging drum components. 4 3 2 1 1 Handle 2 Imaging drum 3 Protective shield 4 Memory chip CAUTION: If toner gets on clothing, wipe it off by using a dry cloth and wash the clothes in cold water. Hot water sets toner into fabric. 70 Chapter 3 Supplies, accessories, and parts ENWW
-
 1
1 -
2
-
3
-
4
-
5
-
6
-
7
-
8
-
9
-
10
-
11
-
12
-
13
-
14
-
15
-
16
-
17
-
18
-
19
-
20
-
21
-
22
-
23
-
24
-
25
-
26
-
27
-
28
-
29
-
30
-
31
-
32
-
33
-
34
-
35
-
36
-
37
-
38
-
39
-
40
-
41
-
42
-
43
-
44
-
45
-
46
-
47
-
48
-
49
-
50
-
51
-
52
-
53
-
54
-
55
-
56
-
57
-
58
-
59
-
60
-
61
-
62
-
63
-
64
-
65
-
66
-
67
-
68
-
69
-
70
-
71
-
72
-
73
-
74
-
 75
75 -
 76
76 -
 77
77 -
 78
78 -
 79
79 -
 80
80 -
 81
81 -
 82
82 -
 83
83 -
 84
84 -
 85
85 -
86
-
87
-
88
-
89
-
90
-
91
-
92
-
93
-
94
-
95
-
96
-
97
-
98
-
99
-
100
-
101
-
102
-
103
-
104
-
105
-
106
-
107
-
108
-
109
-
110
-
111
-
112
-
113
-
114
-
115
-
116
-
117
-
118
-
119
-
120
-
121
-
122
-
123
-
124
-
125
-
126
-
127
-
128
-
129
-
130
-
131
-
132
-
133
-
134
-
135
-
136
-
137
-
138
-
139
-
140
-
141
-
142
-
143
-
144
-
145
-
146
-
147
-
148
-
149
-
150
-
151
-
152
-
153
-
154
-
155
-
156
-
157
-
158
-
159
-
160
-
161
-
162
-
163
-
164
-
165
-
166
-
167
-
168
-
169
-
170
-
171
-
172
-
173
-
174
-
175
-
176
-
177
-
178
-
179
-
180
-
181
-
182
-
183
-
184
-
185
-
186
-
187
-
188
-
189
-
190
 |
 |