HP LaserJet Pro 100 Service Manual - Page 108
Print-quality troubleshooting tools, Repetitive image defects ruler, Calibrate the product - color toner
 |
View all HP LaserJet Pro 100 manuals
Add to My Manuals
Save this manual to your list of manuals |
Page 108 highlights
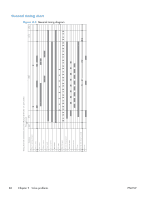
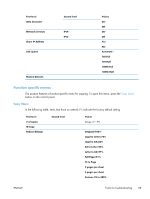
Print-quality troubleshooting tools Repetitive image defects ruler If the product output has a consistent, repetitive defect, then use the table in this section to determine which part needs to be cleaned or replaced based on the measured distance between the repetitions of the defect. NOTE: Spots can be dark or white (dropouts), bands can be all shapes and sizes. Component Distance between defects (mm) Type of defects Developing roller1 About 22 Dropouts Dark, sharp bands Primary charging roller1 About 26 Dropouts RS roller About 29 Dropouts Secondary transfer roller About 47 Dropouts Dirt on the back of page Fuser film About 58 Dropouts Dirt on page Loose toner Pressure roller About 63 Dirt on page Dirt on the back of page Loose toner ITB drive roller About 76 Spots Photosensitive drum1 About 95 Dropouts Dirt on page 1 The primary charging roller, photosensitive drum, and developing drum cannot be cleaned. If these rollers cause a repetitive defect, replace the corresponding cartridge, either the imaging-drum cartridge, or developing cartridge. Calibrate the product 1. Press the Setup button to open the menus. 2. Use the arrow buttons to scroll to the System Setup menu, and then press the OK button. 3. Use the arrow buttons to scroll to the Print Quality menu, and then press the OK button. 4. Use the arrow buttons to scroll to the Calibrate Color item, and then press the OK button. 5. Use the arrow buttons to scroll to the Calibrate Now option, and then press the OK button. 90 Chapter 2 Solve problems ENWW
-
 1
1 -
2
-
3
-
4
-
5
-
6
-
7
-
8
-
9
-
10
-
11
-
12
-
13
-
14
-
15
-
16
-
17
-
18
-
19
-
20
-
21
-
22
-
23
-
24
-
25
-
26
-
27
-
28
-
29
-
30
-
31
-
32
-
33
-
34
-
35
-
36
-
37
-
38
-
39
-
40
-
41
-
42
-
43
-
44
-
45
-
46
-
47
-
48
-
49
-
50
-
51
-
52
-
53
-
54
-
55
-
56
-
57
-
58
-
59
-
60
-
61
-
62
-
63
-
64
-
65
-
66
-
67
-
68
-
69
-
70
-
71
-
72
-
73
-
74
-
75
-
76
-
77
-
78
-
79
-
80
-
81
-
82
-
83
-
84
-
85
-
86
-
87
-
88
-
89
-
90
-
91
-
92
-
93
-
94
-
95
-
96
-
97
-
98
-
99
-
100
-
101
-
102
-
 103
103 -
 104
104 -
 105
105 -
 106
106 -
 107
107 -
 108
108 -
 109
109 -
 110
110 -
 111
111 -
 112
112 -
 113
113 -
114
-
115
-
116
-
117
-
118
-
119
-
120
-
121
-
122
-
123
-
124
-
125
-
126
-
127
-
128
-
129
-
130
-
131
-
132
-
133
-
134
-
135
-
136
-
137
-
138
-
139
-
140
-
141
-
142
-
143
-
144
-
145
-
146
-
147
-
148
-
149
-
150
-
151
-
152
-
153
-
154
-
155
-
156
-
157
-
158
-
159
-
160
-
161
-
162
-
163
-
164
-
165
-
166
-
167
-
168
-
169
-
170
 |
 |