HP LaserJet Pro 100 Service Manual - Page 116
Secondary service menu structure, Secondary service menu - 79 service error
 |
View all HP LaserJet Pro 100 manuals
Add to My Manuals
Save this manual to your list of manuals |
Page 116 highlights
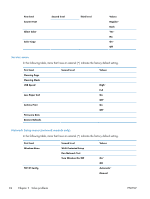
Secondary service menu structure Table 2-3 Secondary service menu Menu item Sub-menu item Service Reports Cont. Self-Test Error report Location A list of available locations appears Display test Button test Color Cal. Clean Belt Pick roller Adjust color Timing Description This item prints a continuous configuration page. This item prints an error report that contains the last 5 instances of 49 Error, Turn off then on or 79 Error, Turn off then on errors. This item sets certain product parameters that are dependent on the location, such as the default paper size and the symbol set. Scroll to the appropriate location and select Yes to set the location. The product automatically restarts after you change the location. This test verifies that the LEDs and characters on the control-panel display function correctly. At the beginning of the test, each of the LEDs is turned on one-at-time. Press the OK button to continue to the next LED. After the LED test is complete, the character test begins by testing the pixels on each line. Then, each of the 255 characters is displayed in groups of 16. Press the OK button to continue to the next group of 16 characters. You can cancel the test at any time by touching the Cancel button. This test verifies that the control-panel buttons function correctly. The display prompts you to press each button. This item adjusts density settings for contrast, highlights, midtones, and shadows. Adjust each color individually. This item specifies how frequently the product should automatically perform a color calibration. The default setting is 48 hours. You can turn automatic calibration off. This item runs additional belt-cleaning cycles. This item puts the pickup roller in position for replacement. 98 Chapter 2 Solve problems ENWW
-
 1
1 -
2
-
3
-
4
-
5
-
6
-
7
-
8
-
9
-
10
-
11
-
12
-
13
-
14
-
15
-
16
-
17
-
18
-
19
-
20
-
21
-
22
-
23
-
24
-
25
-
26
-
27
-
28
-
29
-
30
-
31
-
32
-
33
-
34
-
35
-
36
-
37
-
38
-
39
-
40
-
41
-
42
-
43
-
44
-
45
-
46
-
47
-
48
-
49
-
50
-
51
-
52
-
53
-
54
-
55
-
56
-
57
-
58
-
59
-
60
-
61
-
62
-
63
-
64
-
65
-
66
-
67
-
68
-
69
-
70
-
71
-
72
-
73
-
74
-
75
-
76
-
77
-
78
-
79
-
80
-
81
-
82
-
83
-
84
-
85
-
86
-
87
-
88
-
89
-
90
-
91
-
92
-
93
-
94
-
95
-
96
-
97
-
98
-
99
-
100
-
101
-
102
-
103
-
104
-
105
-
106
-
107
-
108
-
109
-
110
-
 111
111 -
 112
112 -
 113
113 -
 114
114 -
 115
115 -
 116
116 -
 117
117 -
 118
118 -
 119
119 -
 120
120 -
 121
121 -
122
-
123
-
124
-
125
-
126
-
127
-
128
-
129
-
130
-
131
-
132
-
133
-
134
-
135
-
136
-
137
-
138
-
139
-
140
-
141
-
142
-
143
-
144
-
145
-
146
-
147
-
148
-
149
-
150
-
151
-
152
-
153
-
154
-
155
-
156
-
157
-
158
-
159
-
160
-
161
-
162
-
163
-
164
-
165
-
166
-
167
-
168
-
169
-
170
 |
 |