HP LaserJet Pro 100 Service Manual - Page 61
ITB assembly, Remove the ITB assembly, CAUTION, Before proceeding, remove the following components
 |
View all HP LaserJet Pro 100 manuals
Add to My Manuals
Save this manual to your list of manuals |
Page 61 highlights
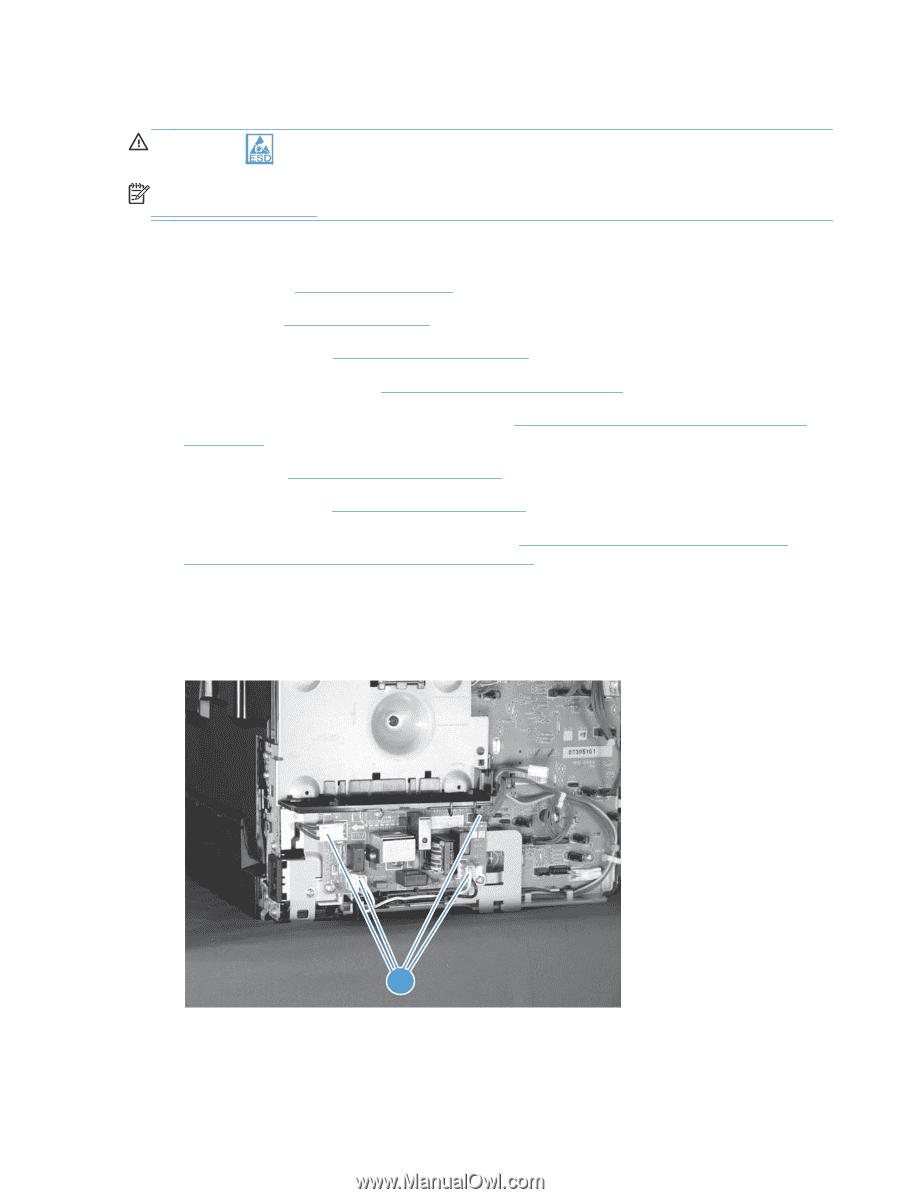
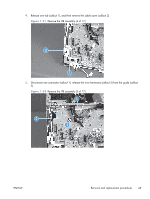
ITB assembly CAUTION: ESD sensitive. NOTE: If you have not removed the image drum before servicing the product, remove it now. See Imaging drum on page 9. Before proceeding, remove the following components: ● Right cover. See Right cover on page 16 ● Left cover. See Left cover on page 17. ● Document feeder. See Document feeder on page 18. ● Document feeder hinges. See Document feeder hinges on page 21. ● Top door, rear-top cover, and delivery cover. See Top door, rear-top cover, and delivery cover on page 22. ● Rear door. See Rear door assembly on page 27. ● Rear-lower cover. See Rear-lower cover on page 28. ● Formatter PCA or formatter and wireless PCA. See Formatter PCA (base model) on page 38 or Formatter and wireless PCA (plus model) on page 40. Remove the ITB assembly 1. Disconnect four connectors. Figure 1-48 Remove the ITB assembly (1 of 17) ENWW 1 Removal and replacement procedures 43
-
 1
1 -
2
-
3
-
4
-
5
-
6
-
7
-
8
-
9
-
10
-
11
-
12
-
13
-
14
-
15
-
16
-
17
-
18
-
19
-
20
-
21
-
22
-
23
-
24
-
25
-
26
-
27
-
28
-
29
-
30
-
31
-
32
-
33
-
34
-
35
-
36
-
37
-
38
-
39
-
40
-
41
-
42
-
43
-
44
-
45
-
46
-
47
-
48
-
49
-
50
-
51
-
52
-
53
-
54
-
55
-
 56
56 -
 57
57 -
 58
58 -
 59
59 -
 60
60 -
 61
61 -
 62
62 -
 63
63 -
 64
64 -
 65
65 -
 66
66 -
67
-
68
-
69
-
70
-
71
-
72
-
73
-
74
-
75
-
76
-
77
-
78
-
79
-
80
-
81
-
82
-
83
-
84
-
85
-
86
-
87
-
88
-
89
-
90
-
91
-
92
-
93
-
94
-
95
-
96
-
97
-
98
-
99
-
100
-
101
-
102
-
103
-
104
-
105
-
106
-
107
-
108
-
109
-
110
-
111
-
112
-
113
-
114
-
115
-
116
-
117
-
118
-
119
-
120
-
121
-
122
-
123
-
124
-
125
-
126
-
127
-
128
-
129
-
130
-
131
-
132
-
133
-
134
-
135
-
136
-
137
-
138
-
139
-
140
-
141
-
142
-
143
-
144
-
145
-
146
-
147
-
148
-
149
-
150
-
151
-
152
-
153
-
154
-
155
-
156
-
157
-
158
-
159
-
160
-
161
-
162
-
163
-
164
-
165
-
166
-
167
-
168
-
169
-
170
 |
 |