HP Model 744 Installing the A4315A and A4316A HCRX/VME Graphics Options - Page 23
Installing the HCRX/VME Graphics Hardware, Removing the Single Boar, d Computer
 |
View all HP Model 744 manuals
Add to My Manuals
Save this manual to your list of manuals |
Page 23 highlights
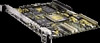
Installing the HCRX/VME Graphics Hardware e. Loosen the SBC's two captive screws with a small flat blade screwdriver. Depending on your configuration, you could have four captive screws - two on the SBC, and two on the expansion slot. If you have these four captive screws, you will need to remove all four. See Figure 2-1. Captive Screws Captive Screws Figure 2-1. Removing the Single Board Computer f. Push the ejector handles to the outside of the board and remove the SBC from the card cage, as shown in Figure 2-1. 2-3
-
 1
1 -
2
-
3
-
4
-
5
-
6
-
7
-
8
-
9
-
10
-
11
-
12
-
13
-
14
-
15
-
16
-
17
-
 18
18 -
 19
19 -
 20
20 -
 21
21 -
 22
22 -
 23
23 -
 24
24 -
 25
25 -
 26
26 -
 27
27 -
 28
28 -
29
-
30
-
31
-
32
-
33
-
34
-
35
-
36
-
37
-
38
-
39
-
40
-
41
-
42
-
43
-
44
-
45
-
46
-
47
-
48
-
49
-
50
-
51
-
52
 |
 |

Installing the HCRX/VME Graphics Hardware
2–3
e.
Loosen the SBC’s two captive screws with a small flat blade screwdriver. Depending
on your configuration, you could have four captive screws – two on the SBC, and
two on the expansion slot. If you have these four captive screws, you will need to
remove all four. See Figure 2–1.
Captive Screws
Captive Screws
Figure 2–1.
Removing the Single Boar
d Computer
f.
Push the ejector handles to the outside of the board and remove the SBC from the
card cage, as shown in Figure 2–1.