HP Model 744 Installing the A4315A and A4316A HCRX/VME Graphics Options - Page 32
Installing the HCRX/VME Graphics Hardware, Reinstalling an Option Board
 |
View all HP Model 744 manuals
Add to My Manuals
Save this manual to your list of manuals |
Page 32 highlights
Installing the HCRX/VME Graphics Hardware Figure 2-8. Reinstalling an Option Board b. Press firmly on the option board until the connectors are fully seated. c. Use the two screws that you removed from the option board earlier to secure it to the HCRX/VME option board. d. Use a #1 Pozidriv screwdriver to tighten the screws. 2-12
-
 1
1 -
2
-
3
-
4
-
5
-
6
-
7
-
8
-
9
-
10
-
11
-
12
-
13
-
14
-
15
-
16
-
17
-
18
-
19
-
20
-
21
-
22
-
23
-
24
-
25
-
26
-
 27
27 -
 28
28 -
 29
29 -
 30
30 -
 31
31 -
 32
32 -
 33
33 -
 34
34 -
 35
35 -
 36
36 -
 37
37 -
38
-
39
-
40
-
41
-
42
-
43
-
44
-
45
-
46
-
47
-
48
-
49
-
50
-
51
-
52
 |
 |

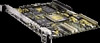
Installing the HCRX/VME Graphics Hardware
2–12
Figure 2–8.
Reinstalling an Option Board
b.
Press firmly on the option board until the connectors are fully seated.
c.
Use the two screws that you removed from the option board earlier to secure it to the
HCRX/VME option board.
d.
Use a #1 Pozidriv screwdriver to tighten the screws.