HP Model 744 Installing the A4315A and A4316A HCRX/VME Graphics Options - Page 28
Install HCRX/VME graphics board., Installing the HCRX/VME Graphics Hardware,
 |
View all HP Model 744 manuals
Add to My Manuals
Save this manual to your list of manuals |
Page 28 highlights
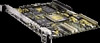
Installing the HCRX/VME Graphics Hardware 5. Install HCRX/VME graphics board. NOTICE: When installing the HCRX/VME graphics board make sure that the memory connector on the left side (front panel facing you) of the SBC has no more than one memory card installed. a. Align the video connector on the HCRX/VME graphics board with the right hand (front panel facing you) cutout on the front extension plate. See Figure 2-6. HCRX/VME Graphics Board SBC Figure 2-6. Installing the HCRX/VME Option Board 2-8
-
 1
1 -
2
-
3
-
4
-
5
-
6
-
7
-
8
-
9
-
10
-
11
-
12
-
13
-
14
-
15
-
16
-
17
-
18
-
19
-
20
-
21
-
22
-
 23
23 -
 24
24 -
 25
25 -
 26
26 -
 27
27 -
 28
28 -
 29
29 -
 30
30 -
 31
31 -
 32
32 -
 33
33 -
34
-
35
-
36
-
37
-
38
-
39
-
40
-
41
-
42
-
43
-
44
-
45
-
46
-
47
-
48
-
49
-
50
-
51
-
52
 |
 |

Installing the HCRX/VME Graphics Hardware
2–8
5.
Install HCRX/VME graphics board.
NOTICE:
When installing the HCRX/VME graphics board make sure that the
memory connector on the left side (front panel facing you) of the
SBC has no more than one memory card installed.
a.
Align the video connector on the HCRX/VME graphics board with the right hand
(front panel facing you) cutout on the front extension plate. See Figure 2–6.
HCRX/VME Graphics Board
SBC
Figure 2–6.
Installing the HCRX/VME Option Board