HP N7710 User Guide - Page 24
Care and maintenance, HP Scanner Tools Utility Maintenance tab - power supply
 |
UPC - 882780998599
View all HP N7710 manuals
Add to My Manuals
Save this manual to your list of manuals |
Page 24 highlights
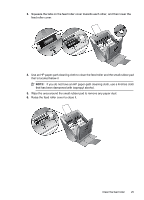
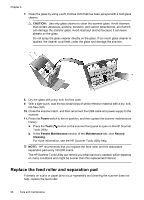
6 Care and maintenance This section presents information about how to care for and maintain the scanner. • HP Scanner Tools Utility Maintenance tab • Order maintenance and scanning supplies • Clean the scanner glass • Clean the paper path • Clean the feed roller • Replace the feed roller and separation pad Occasional cleaning of the scanner helps ensure high-quality scans. The amount of care necessary depends upon several factors, including the amount of use and the environment. You should perform routine cleaning as necessary. CAUTION: Before placing an item in the document feeder, make sure that the item does not contain wet glue, correction fluid, or other substances that can be transferred to the interior of the scanner. Make sure there are no curls, wrinkles, staples, paper clips, or any other attached material. Sheets should not be stuck together. HP Scanner Tools Utility Maintenance tab The Maintenance tab of the HP Scanner Tools Utility displays the scanner usage, maintenance history, and settings. You can record scanner maintenance and change the setting for maintenance alerts. For detailed information, see the HP Scanner Tools Utility help. To open the help, press the Tools button on the scanner front panel, and the click Help in the dialog box. Order maintenance and scanning supplies You can purchase maintenance parts for your scanner. 1. Visit the HP scanner parts Web site at www.hp.com/buy/parts. 2. Select your language, and then click the arrow. Clean the scanner glass Both strips of glass in the scanner should be cleaned periodically. The two small strips of white reflective material should be lightly dusted if debris is present. To clean the strips of glass, follow these steps: 1. Press the Power switch to the off position, and then disconnect the USB cable and power supply from the scanner. 2. Open the scanner hatch. 22 Care and maintenance
-
 1
1 -
2
-
3
-
4
-
5
-
6
-
7
-
8
-
9
-
10
-
11
-
12
-
13
-
14
-
15
-
16
-
17
-
18
-
 19
19 -
 20
20 -
 21
21 -
 22
22 -
 23
23 -
 24
24 -
 25
25 -
 26
26 -
 27
27 -
 28
28 -
 29
29 -
30
-
31
-
32
-
33
-
34
-
35
-
36
-
37
-
38
-
39
-
40
-
41
-
42
 |
 |