HP N7710 User Guide - Page 31
Scanner initialization or hardware problems, Scanner does not start - error codes
 |
UPC - 882780998599
View all HP N7710 manuals
Add to My Manuals
Save this manual to your list of manuals |
Page 31 highlights
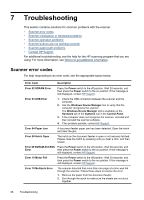
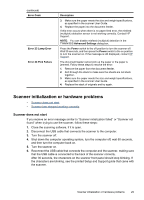
(continued) Error Code Error 23 Lamp Error Error 24 Pick Failure Description 3. Make sure the paper meets the size and weight specifications, as specified in the scanner User Guide. 4. Replace the paper into the document feeder. If this error occurs when there is no paper feed error, the misfeed (multipick) detection sensor is not working correctly. Contact HP Support. NOTE: You can disable misfeed (multipick) detection in the TWAIN/ISIS Advanced Settings dialog box. Press the Power switch to the off position to turn the scanner off. Wait 30 seconds, and then press the Power switch to the on position to turn the scanner on. If the message is still displayed, contact HP Support. The document feeder cannot pick up the paper or the paper is jammed. Follow these steps to resolve the error: 1. Remove the paper from the document feeder. 2. Sort through the stack to make sure the sheets are not stuck together. 3. Make sure the paper meets the size and weight specifications, as specified in the scanner User Guide. 4. Replace the stack of originals and try again. Scanner initialization or hardware problems • Scanner does not start • Scanner has stopped working correctly Scanner does not start If you receive an error message similar to "Scanner initialization failed" or "Scanner not found" when trying to use the scanner, follow these steps: 1. Close the scanning software, if it is open. 2. Disconnect the USB cable that connects the scanner to the computer. 3. Turn the scanner off. 4. Shut down the computer operating system, turn the computer off, wait 60 seconds, and then turn the computer back on. 5. Turn the scanner on. 6. Reconnect the USB cable that connects the computer and the scanner, making sure that the USB cable is connected to the back of the scanner correctly. After 30 seconds, the characters on the scanner front panel should stop blinking. If the characters are blinking, see the printed Setup and Support guide that came with the scanner. Scanner initialization or hardware problems 29
-
 1
1 -
2
-
3
-
4
-
5
-
6
-
7
-
8
-
9
-
10
-
11
-
12
-
13
-
14
-
15
-
16
-
17
-
18
-
19
-
20
-
21
-
22
-
23
-
24
-
25
-
 26
26 -
 27
27 -
 28
28 -
 29
29 -
 30
30 -
 31
31 -
 32
32 -
 33
33 -
 34
34 -
 35
35 -
 36
36 -
37
-
38
-
39
-
40
-
41
-
42
 |
 |