HP PageWide XL 8000 User guide - Page 28
Embedded Web Server access control, Setup, Security, Unlock, Minimum Lock, Moderate Lock
 |
View all HP PageWide XL 8000 manuals
Add to My Manuals
Save this manual to your list of manuals |
Page 28 highlights
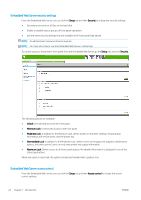
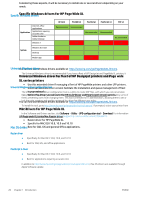
Embedded Web Server security settings From the Embedded Web Server, you can click the Setup tab and then Security to change the security settings: ● Securely erase some or all files on the hard disk ● Enable or disable various groups of front panel operations ● Use the same security settings that are available in the front panel (see above) NOTE: An administrator password may be required. NOTE: For more information, see the Embedded Web Server's online help. To control access to the printer's front panel from the Embedded Web Server, go the Setup tab, and click Security. The following options are available: ● Unlock: Unrestricted access to the front panel. ● Minimum Lock: Unrestricted access to the front panel. ● Moderate Lock: In addition to the Minimum Lock, denies access to all printer settings, the job queue, information and service prints, and the printer log. ● Intermediate Lock: In addition to the Moderate Lock, denies access to the paper, ink supplies, maintenance options, and demo prints. Users can only view printer and supply information. ● Maximum Lock: Denies access to all front-panel options. No detailed information is displayed in any of the status applications. When any option is restricted, the option is locked and marked with a padlock icon. Embedded Web Server access control From the Embedded Web Server, you can click the Setup tab and then Access control to change the access control settings. 22 Chapter 1 Introduction ENWW
-
 1
1 -
2
-
3
-
4
-
5
-
6
-
7
-
8
-
9
-
10
-
11
-
12
-
13
-
14
-
15
-
16
-
17
-
18
-
19
-
20
-
21
-
22
-
 23
23 -
 24
24 -
 25
25 -
 26
26 -
 27
27 -
 28
28 -
 29
29 -
 30
30 -
 31
31 -
 32
32 -
 33
33 -
34
-
35
-
36
-
37
-
38
-
39
-
40
-
41
-
42
-
43
-
44
-
45
-
46
-
47
-
48
-
49
-
50
-
51
-
52
-
53
-
54
-
55
-
56
-
57
-
58
-
59
-
60
-
61
-
62
-
63
-
64
-
65
-
66
-
67
-
68
-
69
-
70
-
71
-
72
-
73
-
74
-
75
-
76
-
77
-
78
-
79
-
80
-
81
-
82
-
83
-
84
-
85
-
86
-
87
-
88
-
89
-
90
-
91
-
92
-
93
-
94
-
95
-
96
-
97
-
98
-
99
-
100
-
101
-
102
-
103
-
104
-
105
-
106
-
107
-
108
-
109
-
110
-
111
-
112
-
113
-
114
-
115
-
116
-
117
-
118
-
119
-
120
-
121
-
122
-
123
-
124
-
125
-
126
-
127
-
128
-
129
-
130
-
131
-
132
-
133
-
134
-
135
-
136
-
137
-
138
-
139
-
140
-
141
-
142
-
143
-
144
-
145
-
146
-
147
-
148
-
149
-
150
 |
 |
