HP PageWide XL 8000 User guide - Page 90
Print from a USB flash drive, flash
 |
View all HP PageWide XL 8000 manuals
Add to My Manuals
Save this manual to your list of manuals |
Page 90 highlights
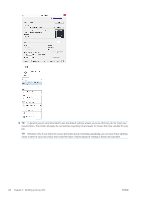
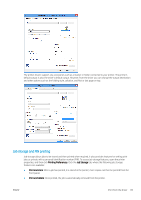
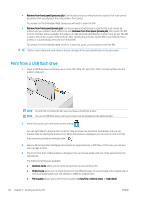
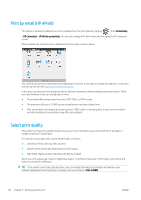
● Retrieve from front panel (personal job): Use the personal job printing feature to specify that a job cannot be printed until you release it from the printer's front panel. To preview it in the Embedded Web Server, you will need to enter the PIN. ● Retrieve from front panel (private job): Use the private printing feature to specify that a job cannot be printed until you release it with a PIN. First, click Retrieve from front panel (private job), after which the PIN to Print checkbox will be available. If checked, a 4-digit personal identification number must be set. The PIN is sent to the printer as part of the print job. After sending the print job, use the PIN to print the job. Once printed, it is automatically removed from the printer. To preview it in the Embedded Web Server or in the front panel, you will need to enter the PIN. TIP: Define a user name and a job name in the job storage tab for easy identification in the job queue. Print from a USB flash drive 1. Insert a USB flash drive containing one or more TIFF, JPEG, HP-GL/2, RTL, PDF, or PostScript files into the printer's USB port. NOTE: To print PDF or PostScript file, you must have a PostScript printer. NOTE: The use of USB flash drives with your printer may be disabled by the administrator. 2. At the front panel, go to the home screen and tap . You can tap folders to browse their contents. Files are shown as document thumbnails, and you can preview a file by tapping the preview icon. When the preview is displayed, you can zoom in and out. Files that cannot be printed are indicated with . 3. Select a file to be printed. Multipage documents are supported only in PDF files; in this case, you can also select a page to print. 4. The list of print-from-USB quicksets is displayed. You can choose and/or edit one of the quicksets for the selected job. The following settings are available: ● Quickset name allows you to name the quickset you are working with. ● Output scale allows you to resize the print in two different ways: to a percentage of its original size, or to fit a particular paper size. The default is 100% (its original size). ● Print quality allows you to set the print quality to Lines/Fast, Uniform areas, or High detail. 84 Chapter 5 Sending a job to print ENWW
-
 1
1 -
2
-
3
-
4
-
5
-
6
-
7
-
8
-
9
-
10
-
11
-
12
-
13
-
14
-
15
-
16
-
17
-
18
-
19
-
20
-
21
-
22
-
23
-
24
-
25
-
26
-
27
-
28
-
29
-
30
-
31
-
32
-
33
-
34
-
35
-
36
-
37
-
38
-
39
-
40
-
41
-
42
-
43
-
44
-
45
-
46
-
47
-
48
-
49
-
50
-
51
-
52
-
53
-
54
-
55
-
56
-
57
-
58
-
59
-
60
-
61
-
62
-
63
-
64
-
65
-
66
-
67
-
68
-
69
-
70
-
71
-
72
-
73
-
74
-
75
-
76
-
77
-
78
-
79
-
80
-
81
-
82
-
83
-
84
-
 85
85 -
 86
86 -
 87
87 -
 88
88 -
 89
89 -
 90
90 -
 91
91 -
 92
92 -
 93
93 -
 94
94 -
 95
95 -
96
-
97
-
98
-
99
-
100
-
101
-
102
-
103
-
104
-
105
-
106
-
107
-
108
-
109
-
110
-
111
-
112
-
113
-
114
-
115
-
116
-
117
-
118
-
119
-
120
-
121
-
122
-
123
-
124
-
125
-
126
-
127
-
128
-
129
-
130
-
131
-
132
-
133
-
134
-
135
-
136
-
137
-
138
-
139
-
140
-
141
-
142
-
143
-
144
-
145
-
146
-
147
-
148
-
149
-
150
 |
 |
